Managing Users
Analytics101 allows you to add users of different roles to collaborate with your them efficiently.
1. How do I add a user?
Analytics101 enables you to add and manage users with varying levels of access and permissions in Setup page.
Follow these steps to add a user:
- Sign in to your Analytics101 account using your credentials via
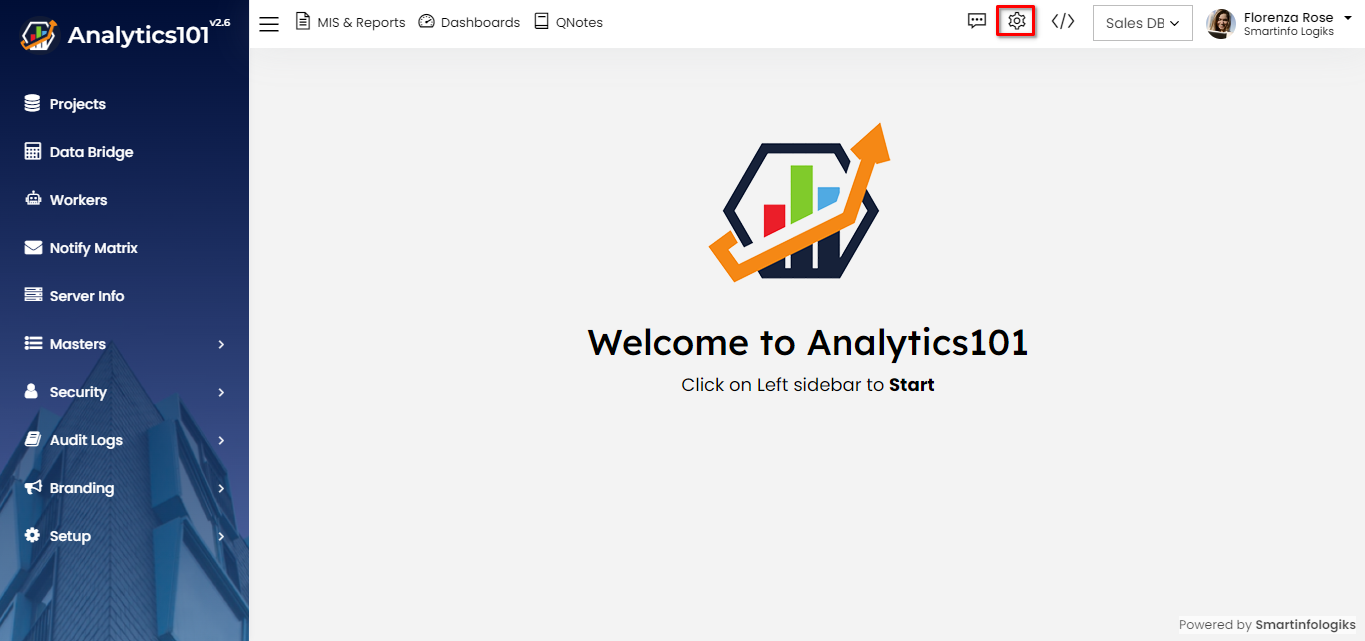
http://uat.stage.silkdemo.in/login?site=analytics101. - Click on the Setup icon located in the top-right corner.
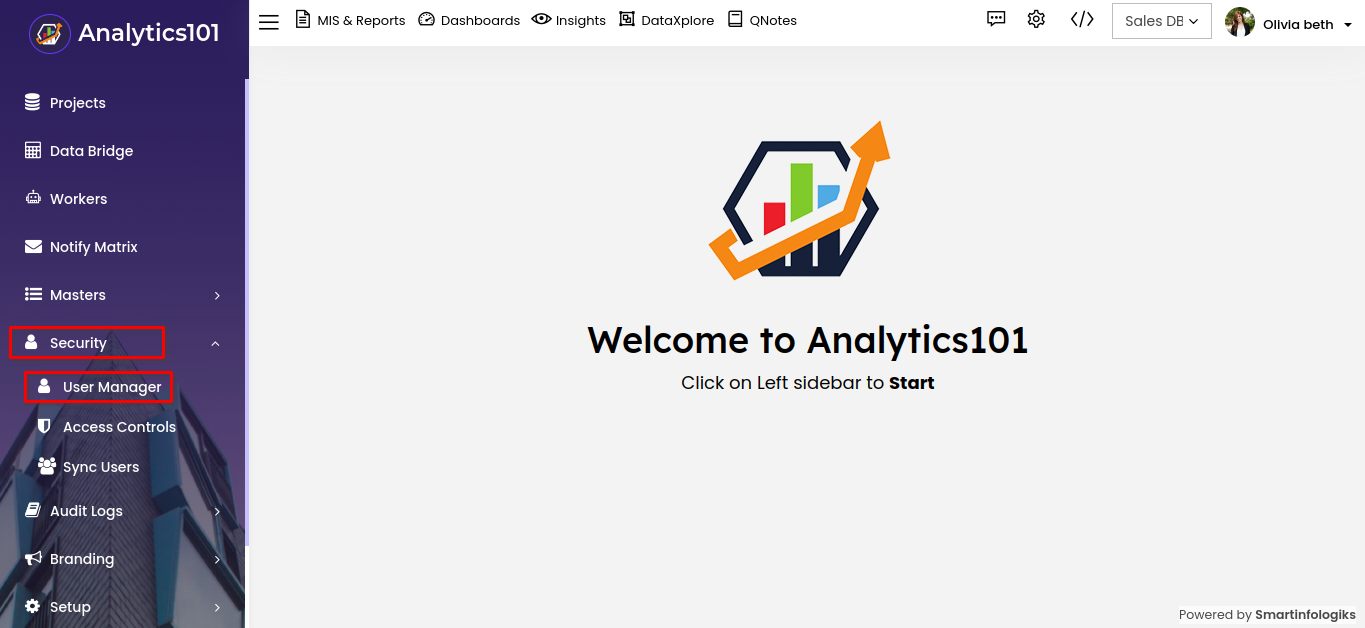
- Open the sidebar, then locate the User Manager section under the Security tab within the sidebar, and click on it.
- Click on the "+" icon to open the 'New User' form.
- Enter required fields in the default tab.
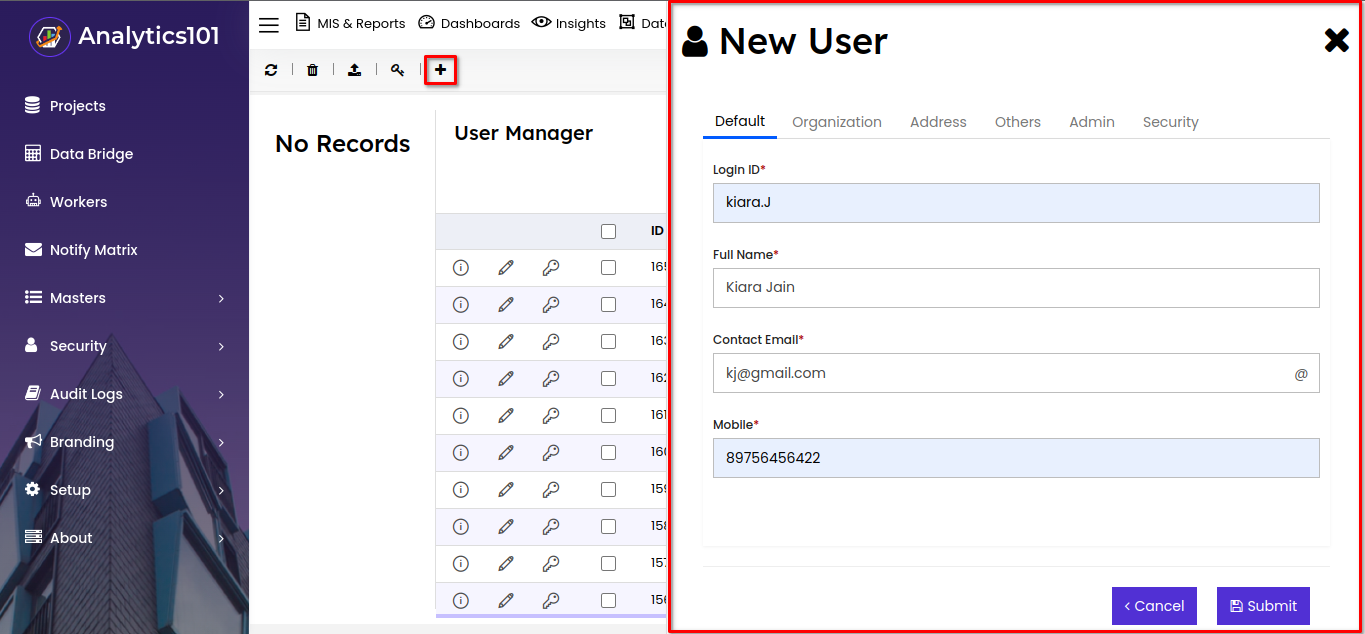
Enter the required (*) fields:
Login ID : Enter the user's login id.
Full Name : Enter the full name of the user.
Contact Email : Enter the user's email id.
Mobile : Enter the user's contact number - Click on the Organization Tab, then proceed to fill in the following fields:
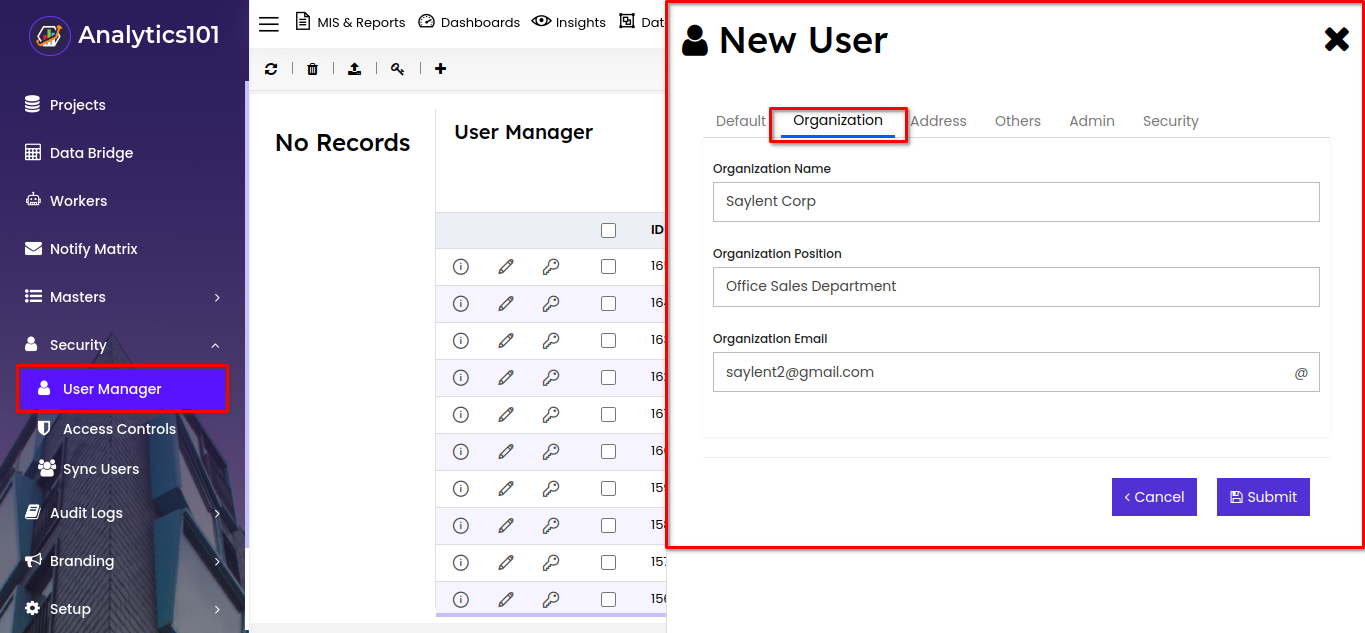
Organization Name : Enter the name of the Organization.
Organization Position : Enter the user's position in the organization..
Organization Email : Enter the organization's email id. - Click on the Address Tab, then proceed to fill in the following fields:
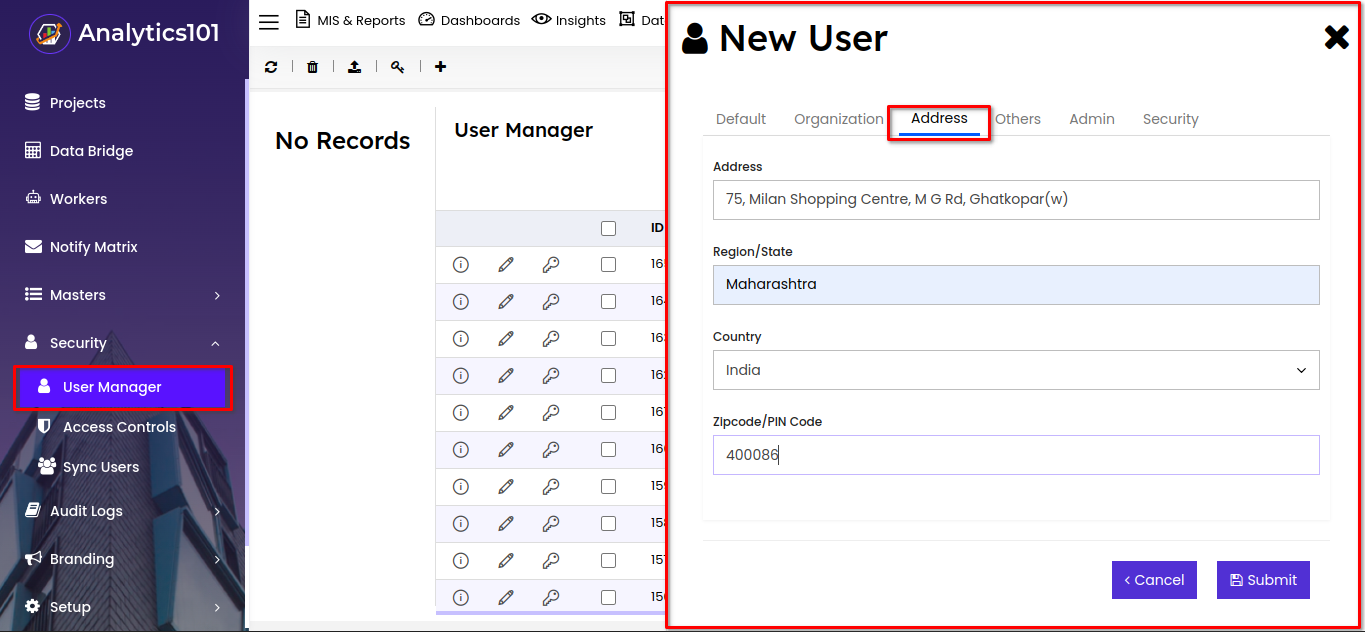
Address : Enter the user address details.
Region/State : Enter the state or region.
Country : Enter the country.
Zipcode/PIN Code : Enter the zip code. - Click on the Others Tab, then proceed to fill in the following fields:
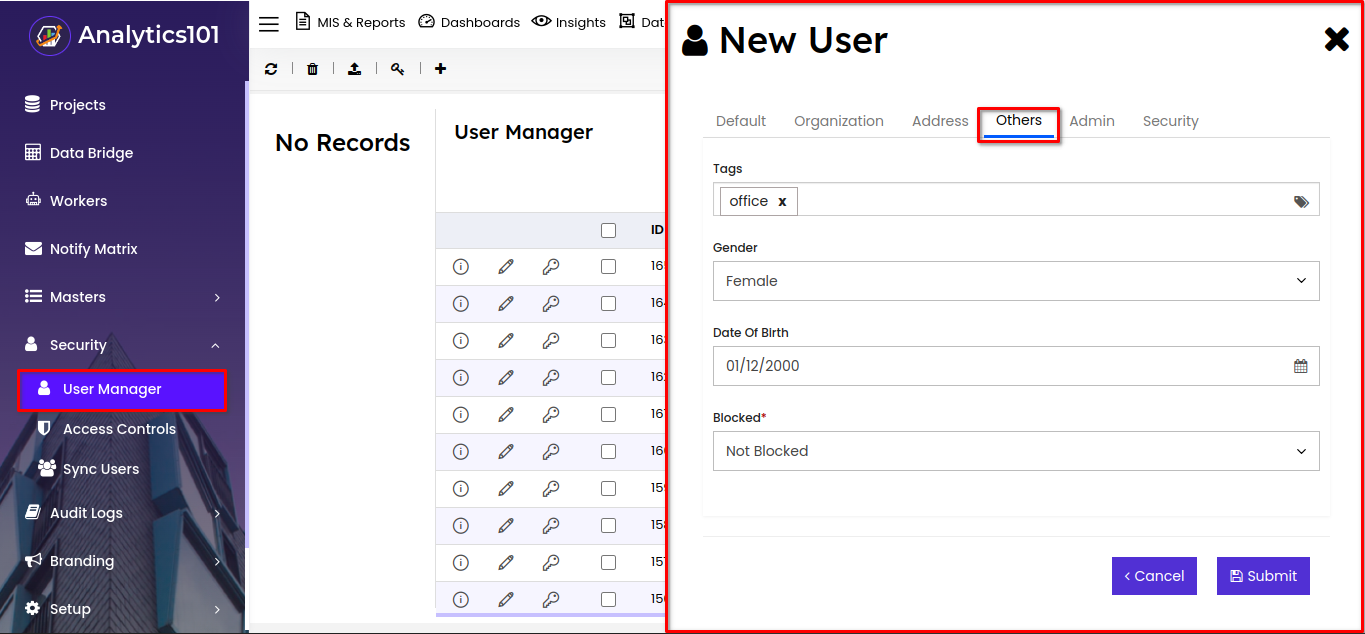
Tags : Enter the tags.
Gender : Select the gender.
Date Of Birth : Specify the DOB of the user.
Blocked : Select block status. - Click on the Admin Tab, then proceed to fill in the following fields:
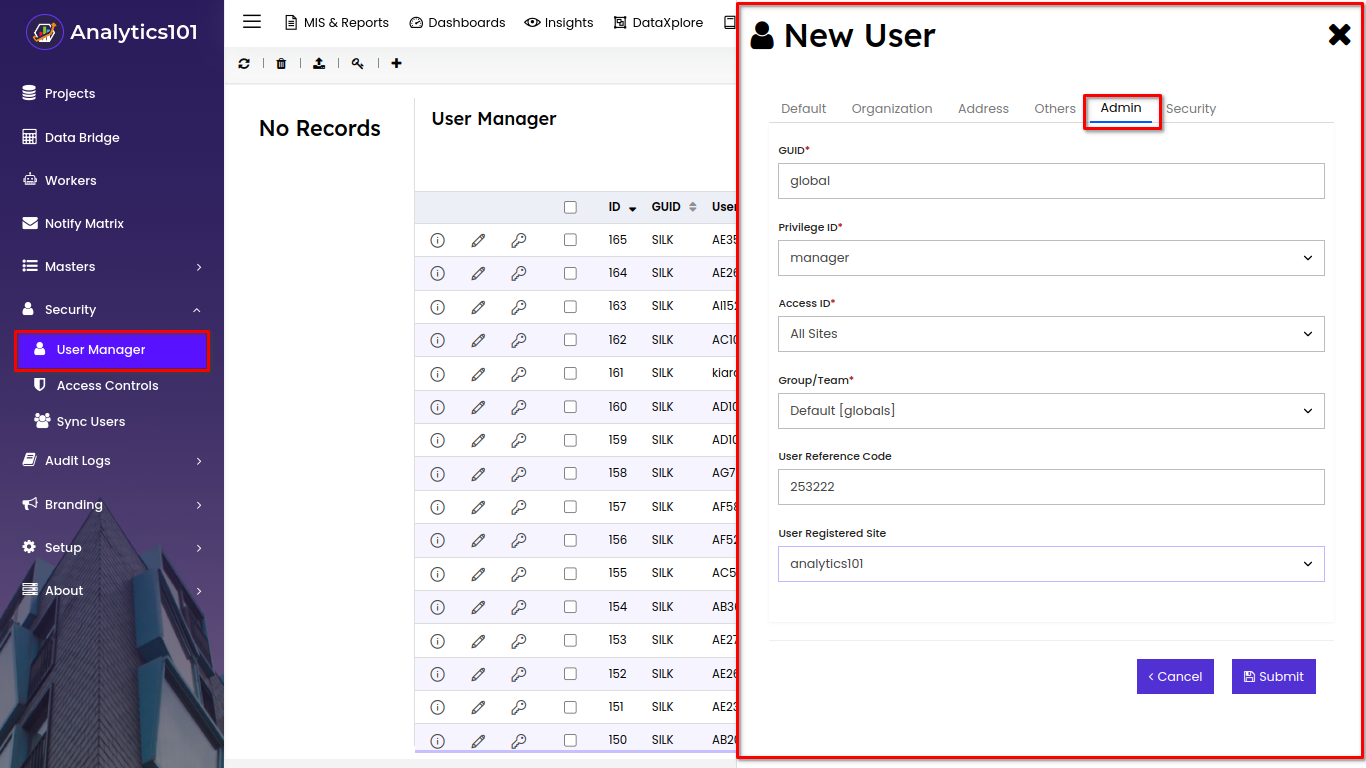
GUID : Enter the GUID.
Privilege ID : Select the Privilege ID.
Access ID : Select the Access ID.
Group/Team : Select the Group/Team.
User Reference Code : Enter reference code.
User Registered Site : Select the registered site. - Click on the Security Tab, then proceed to fill in the following fields:
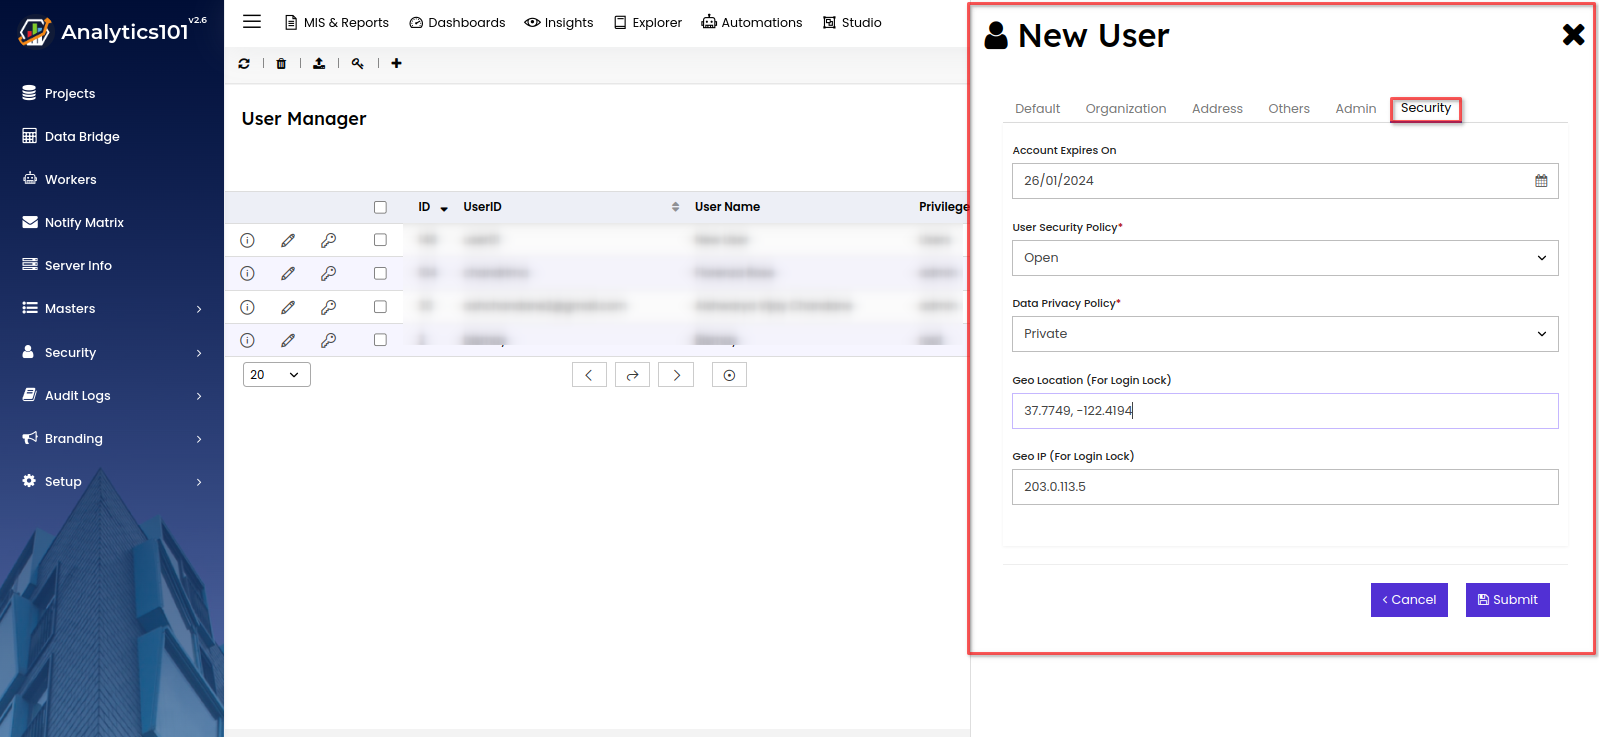
Account Expires On : Select the account expire date.
User Security Policy : Select the User's Security Policy.
Data Privacy Policy : Select the Data Privacy Policy.
Geo Location (For Login Lock) : Enter the Geo location.
Geo IP (For Login Lock) : Enter the Geo IP.
- Enter required fields in the default tab.
- Once submitted, the user will be successfully added to the system with the specified role.
2. How do I set a password for user?
Follow these steps to set a password for the user:
- In the report, click on the Key icon next to the new user.
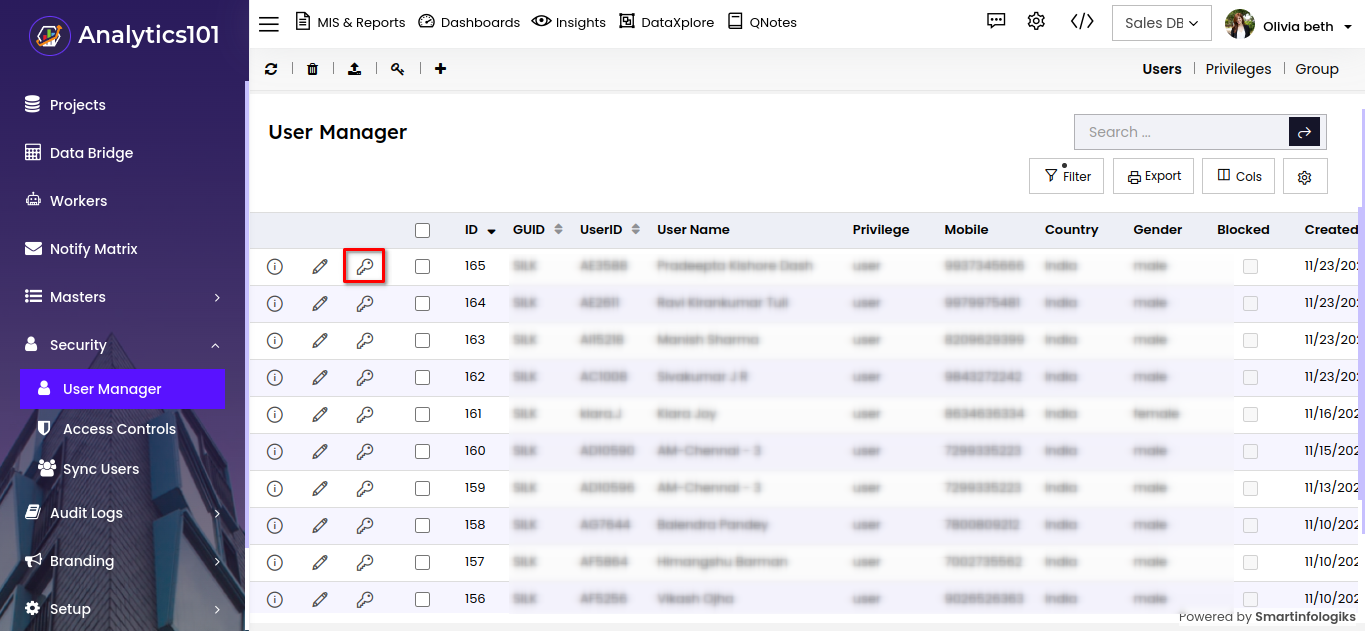
- After clicking the key icon, the Password Manager form opens, as depicted in the image.
- To set a new password, you have the option to either create a custom password or generate a random one.
- To set a custom password, enter a password and click on Update.
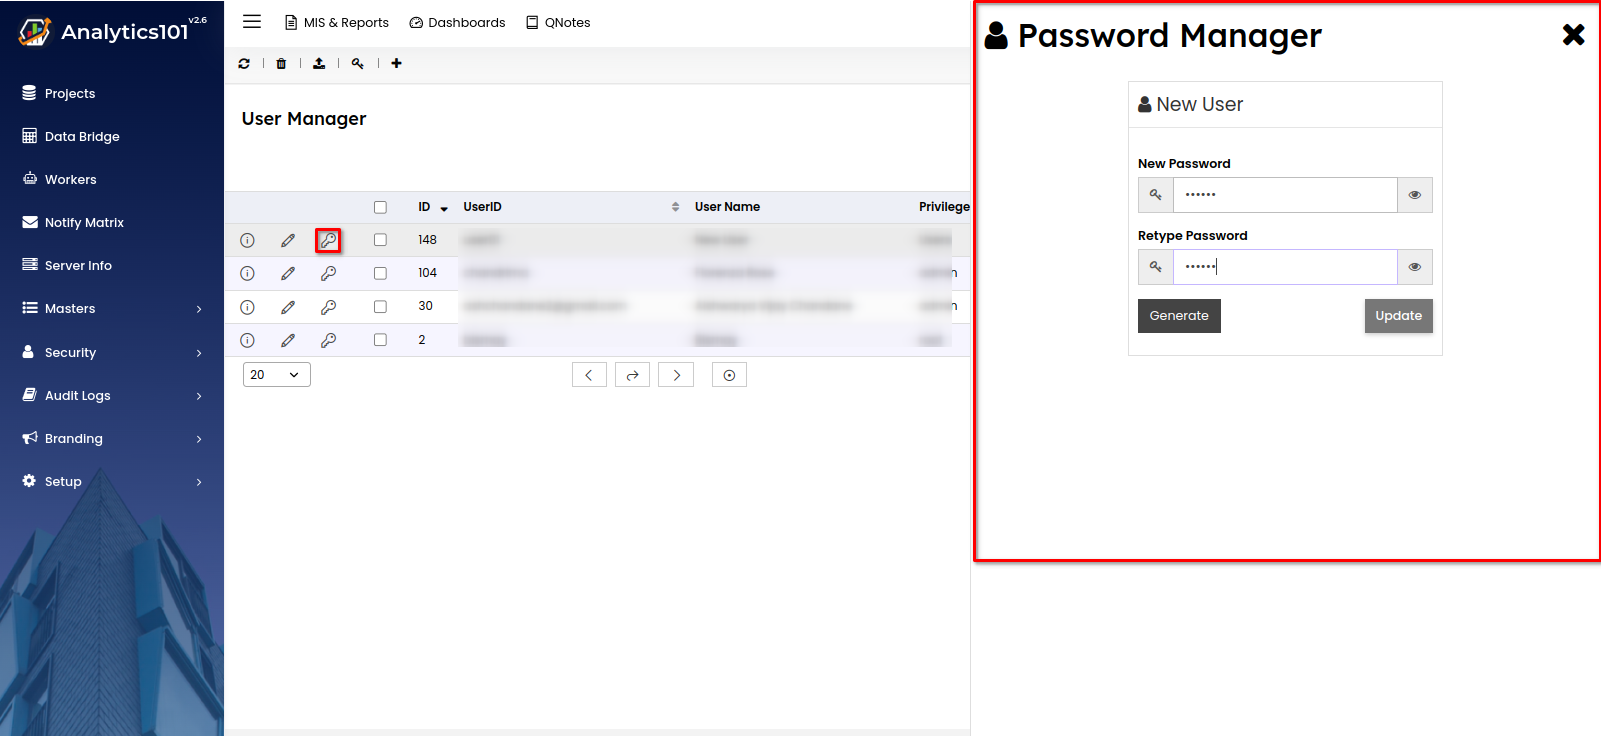
- To set a random password, click on the 'Generate' button.
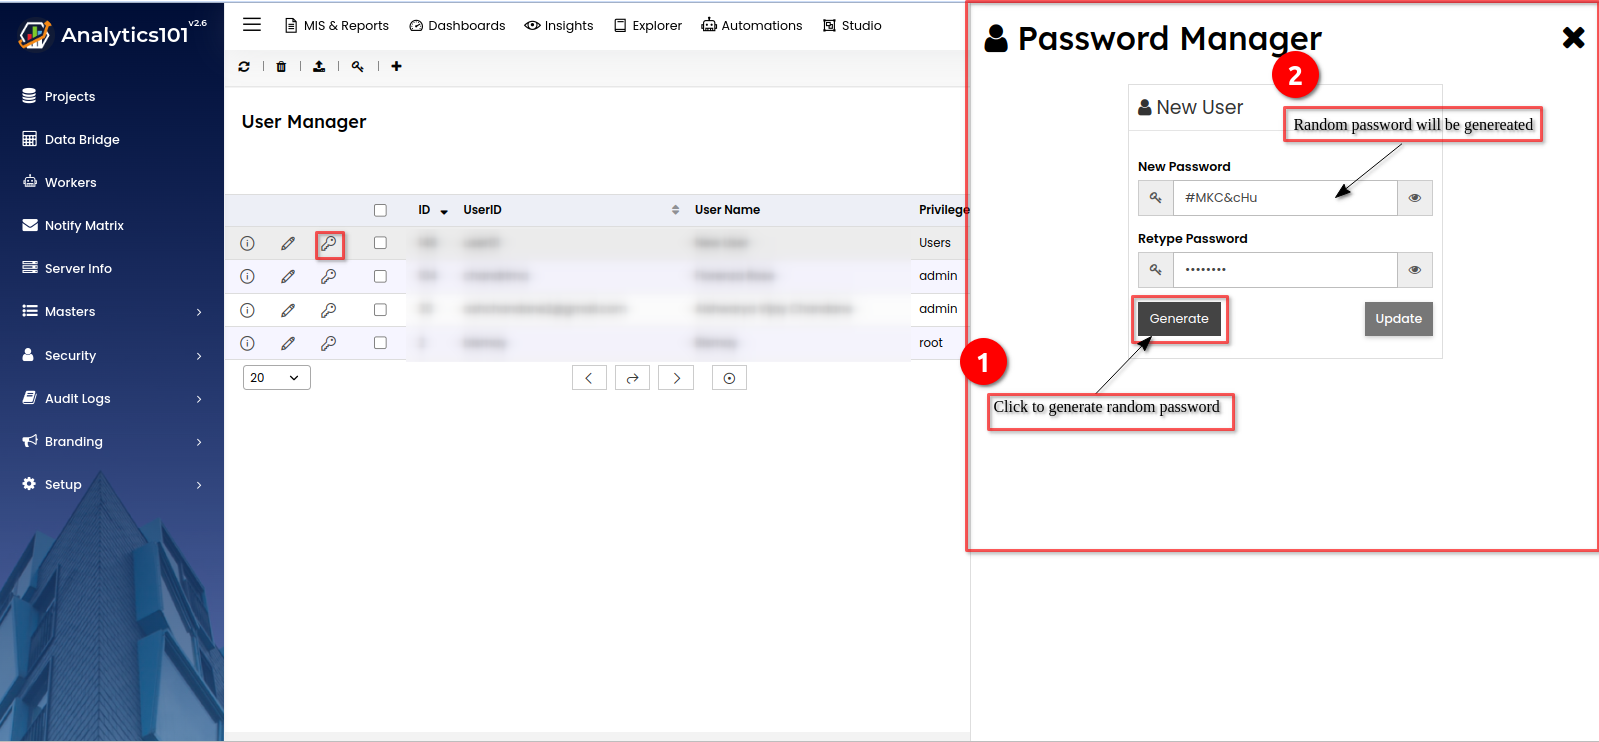
- A random password will be generated. Then, click on the 'Update' button to set the generated password.
- To set a custom password, enter a password and click on Update.
3. How do I manage Users in Analytics101?
You can manage all users of your organization from the User Manager in the Analytics101 Setup page.
- All the users from your organization will be listed here.
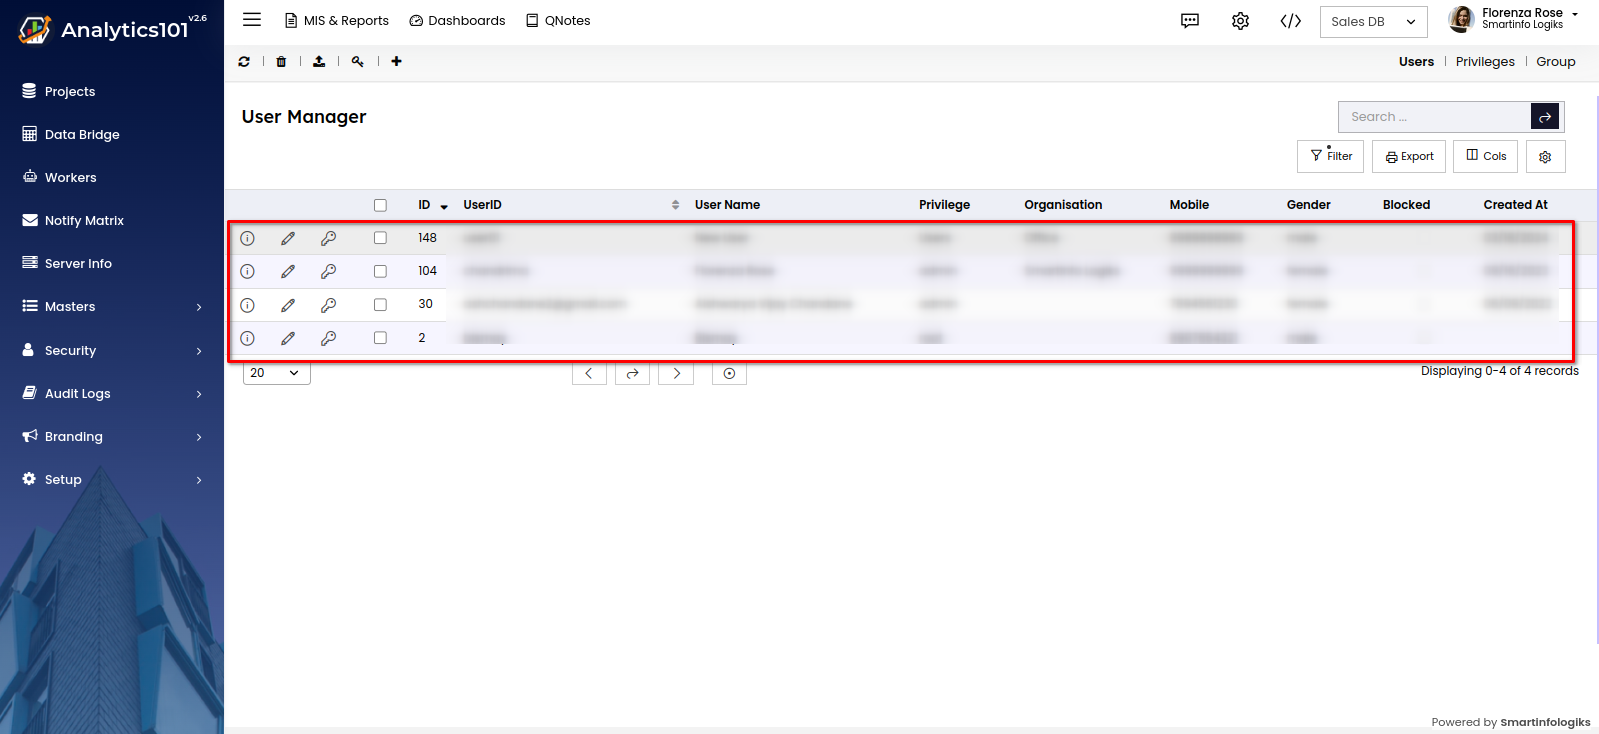
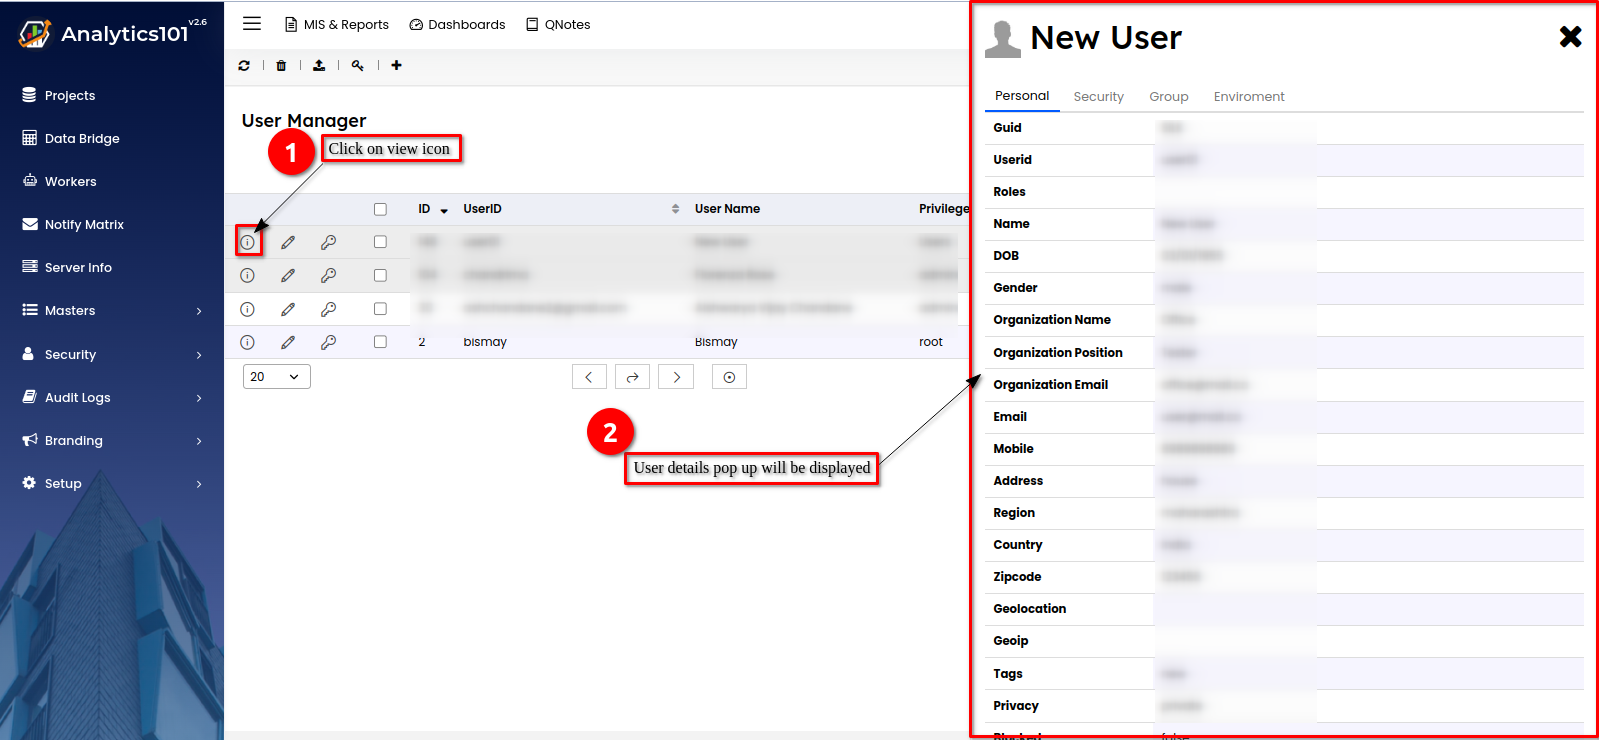
- To view the details of the users, click on the 'View' icon.
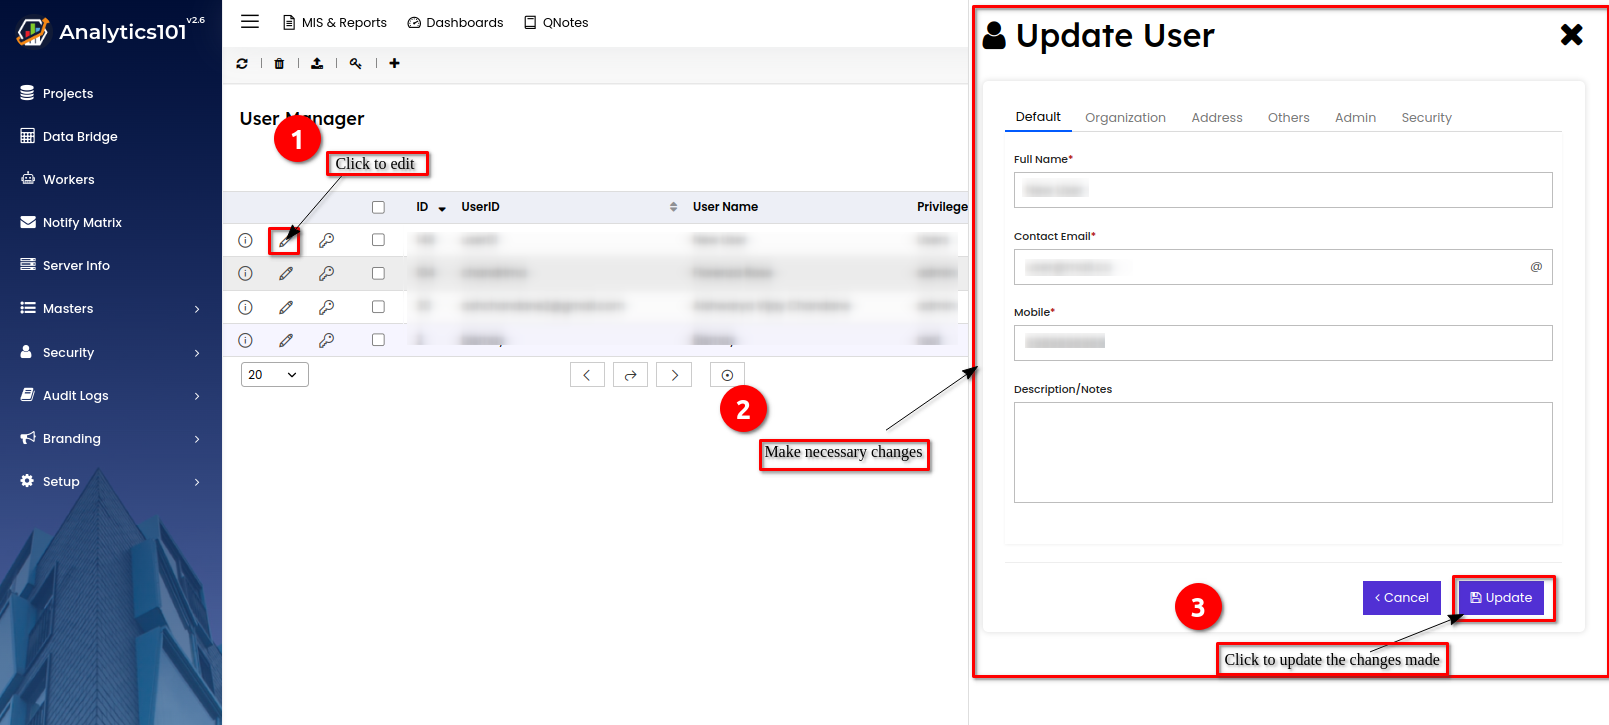
- To edit the user details, click on the 'Edit' icon and make necessary changes in the update user form. Once done, click the 'Update' button to save the changes.
- To change the password of an existing user, click on the 'Key' icon.
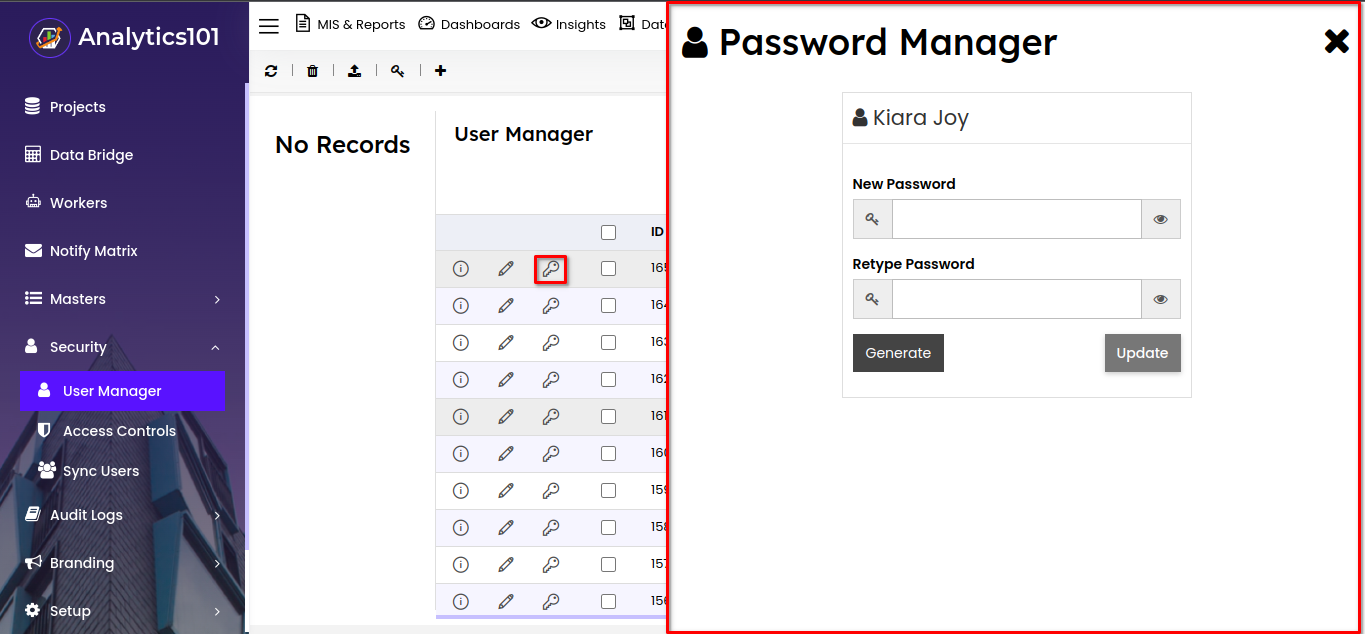
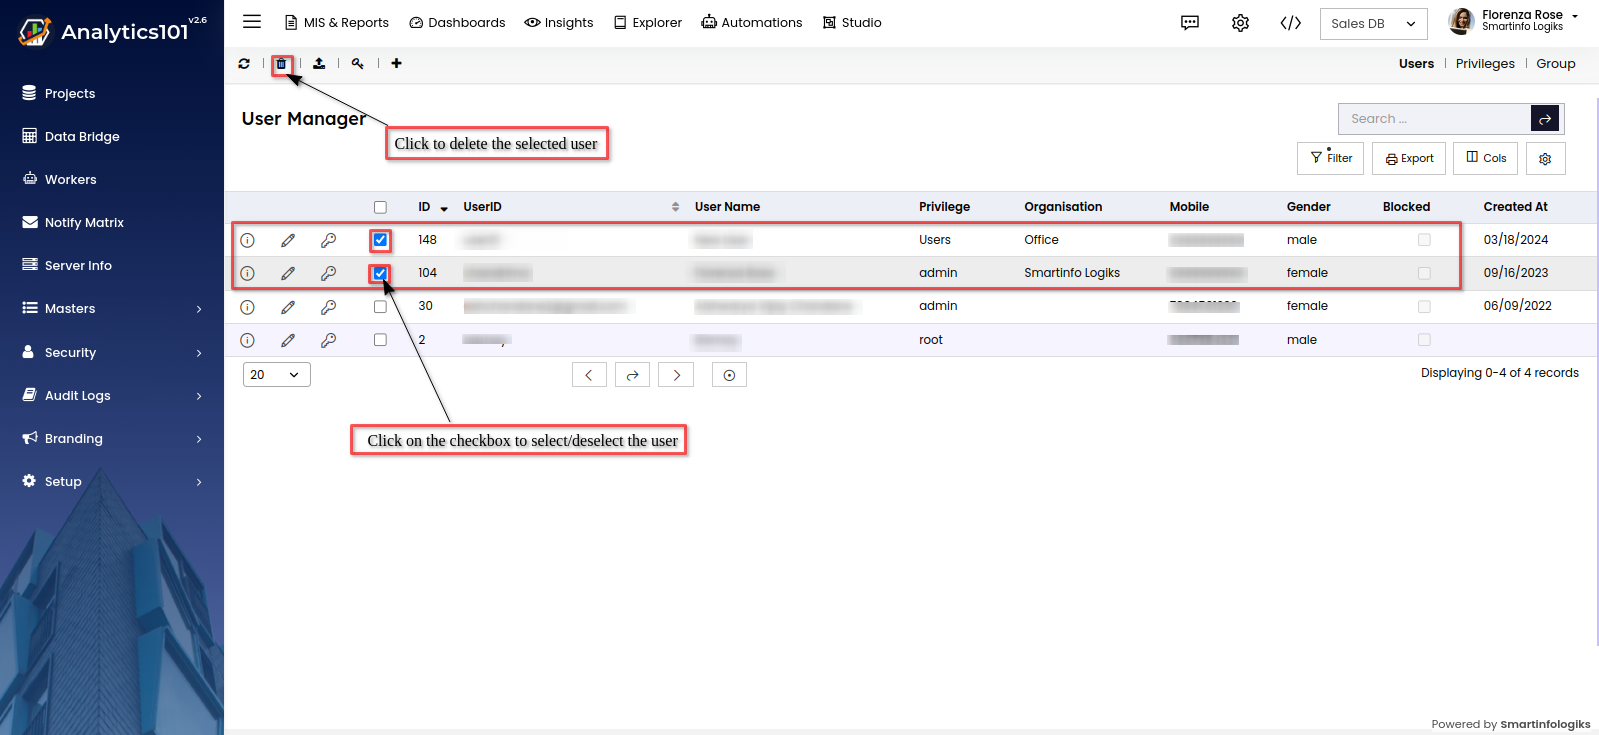
(Please refer to 'How do I change my password?' for instructions on changing the password.) - To delete the user, select the checkbox next to the user and then click on the delete icon.
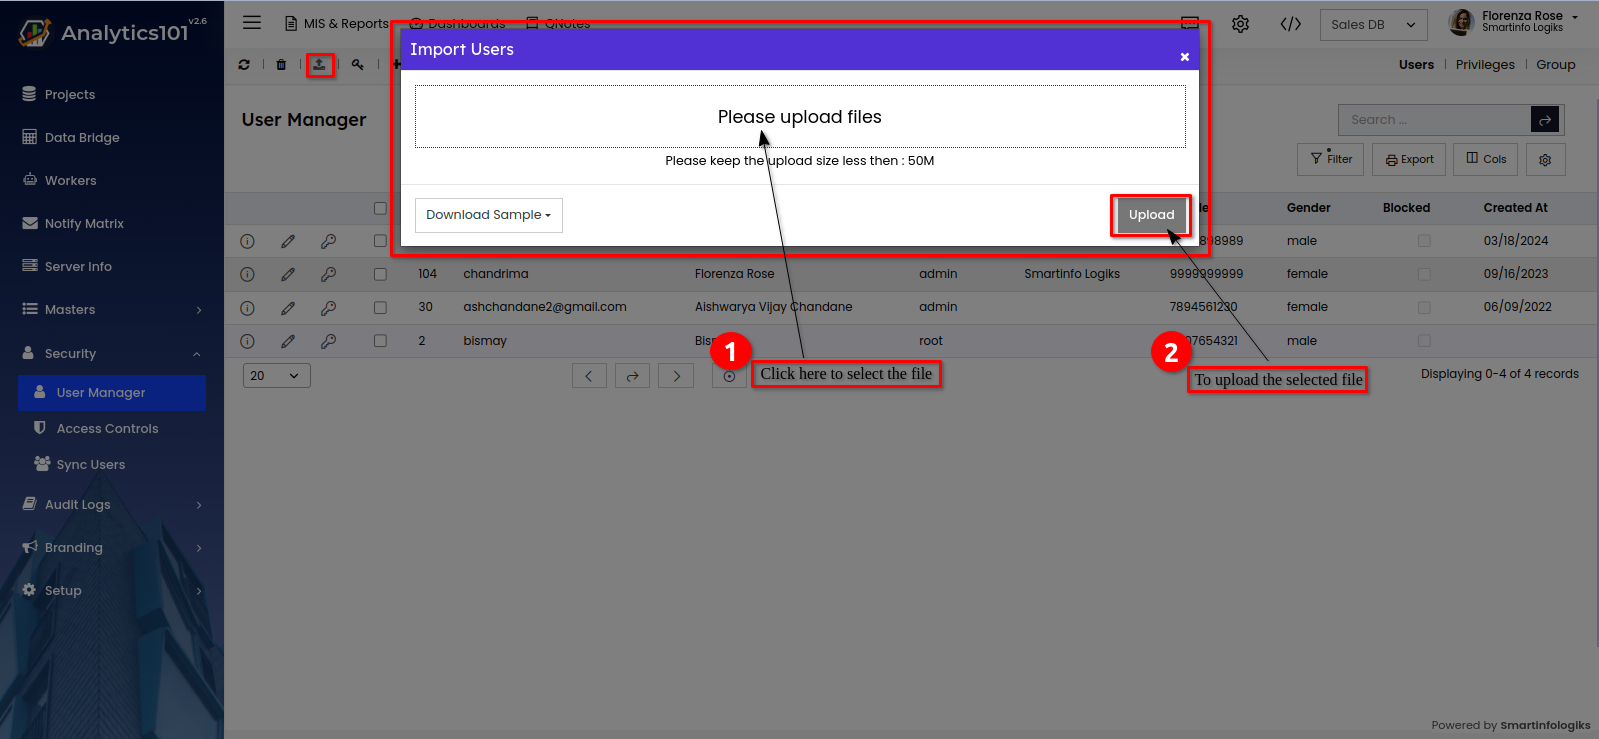
- To Import a user, click on the Import icon. A pop-up window will appear to guide you through the user import process.
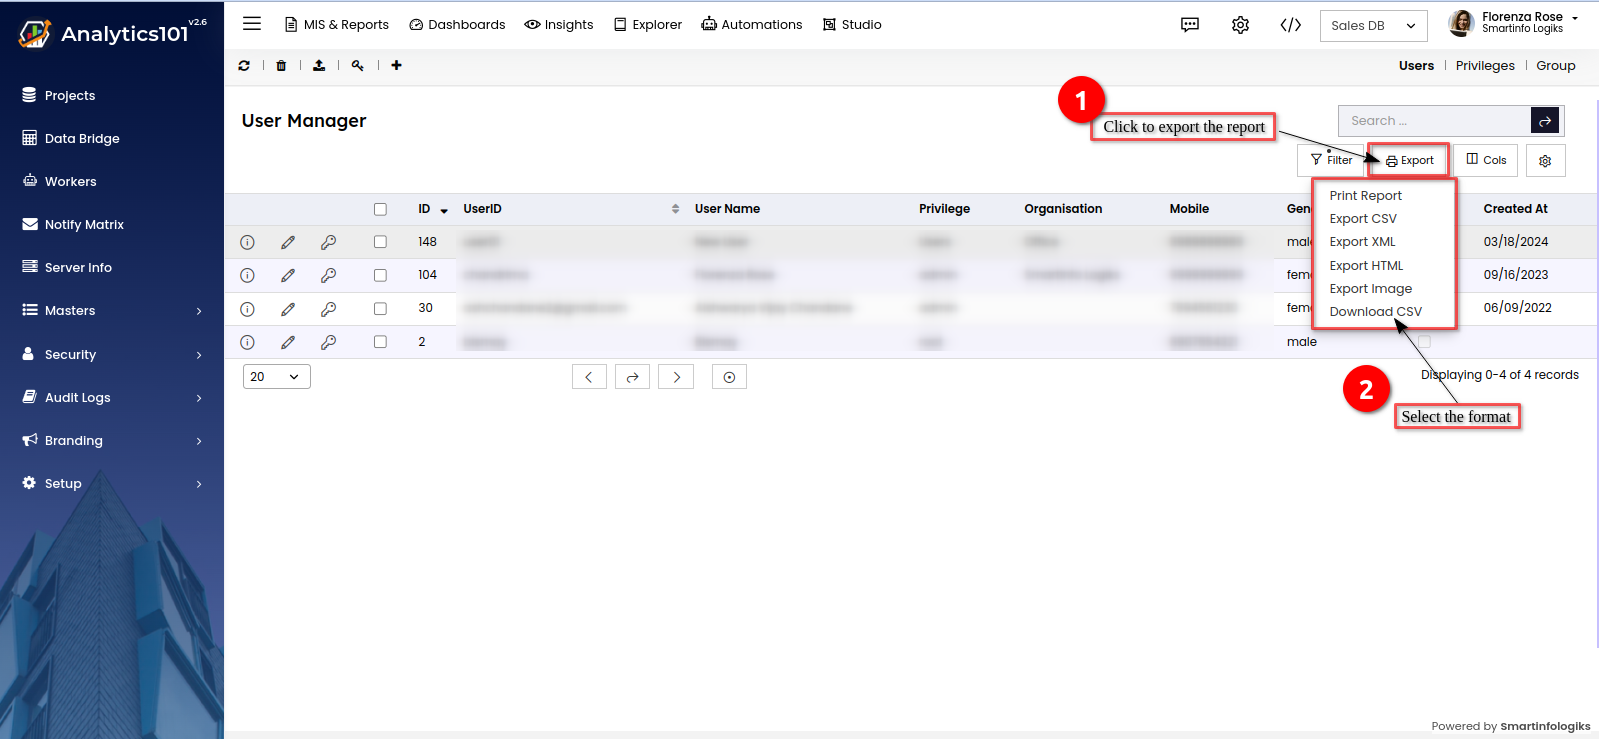
- To export the log of created users, click on the 'Export' button, and choose the desired format for the report.
4. How do I Create a Privilege ?
The privilege section assigns roles like admin, manager, and user, regulating their access and permissions. It's a hub for managing user roles, ensuring efficient responsibility delegation and secure resource access.
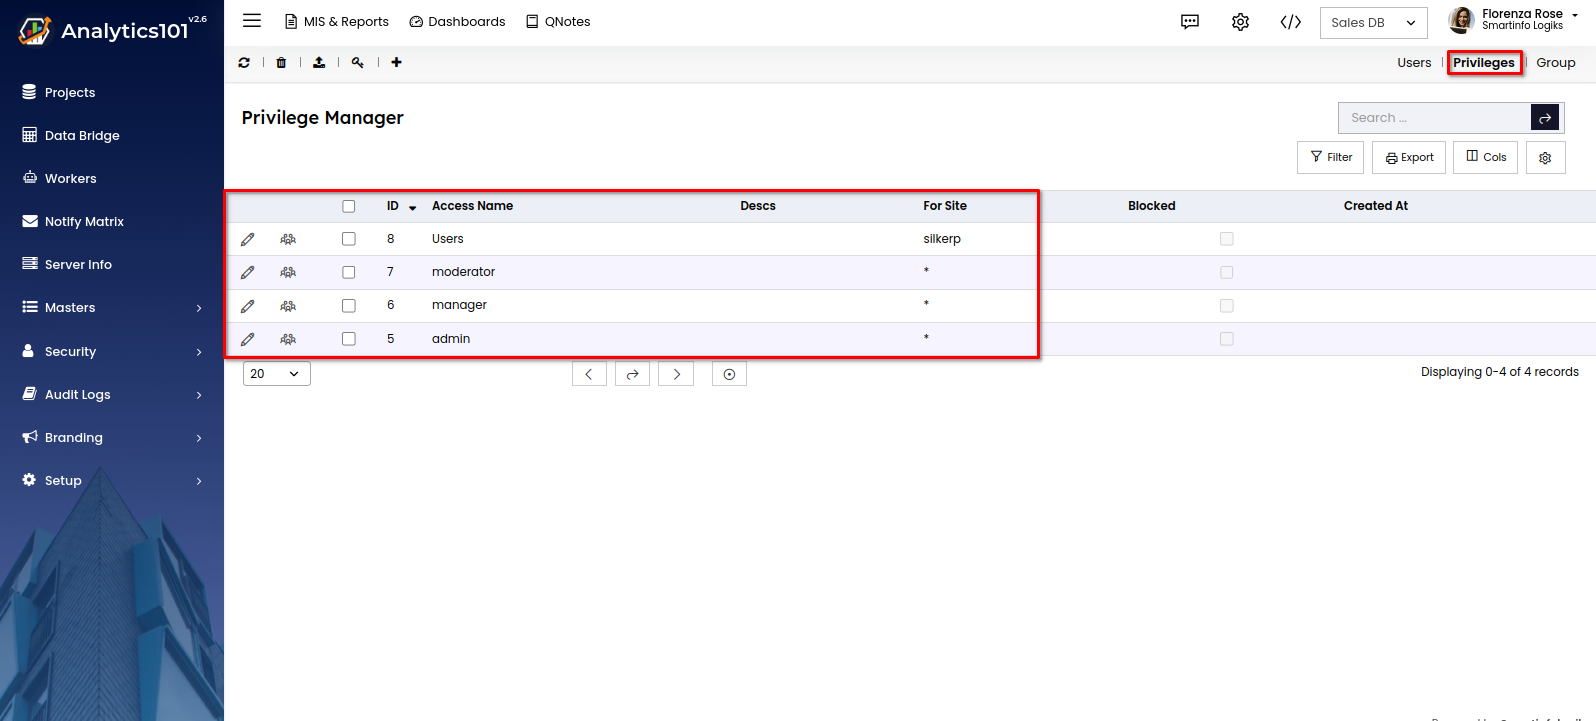
- Go to privilege tab in user manager as shown in the image.
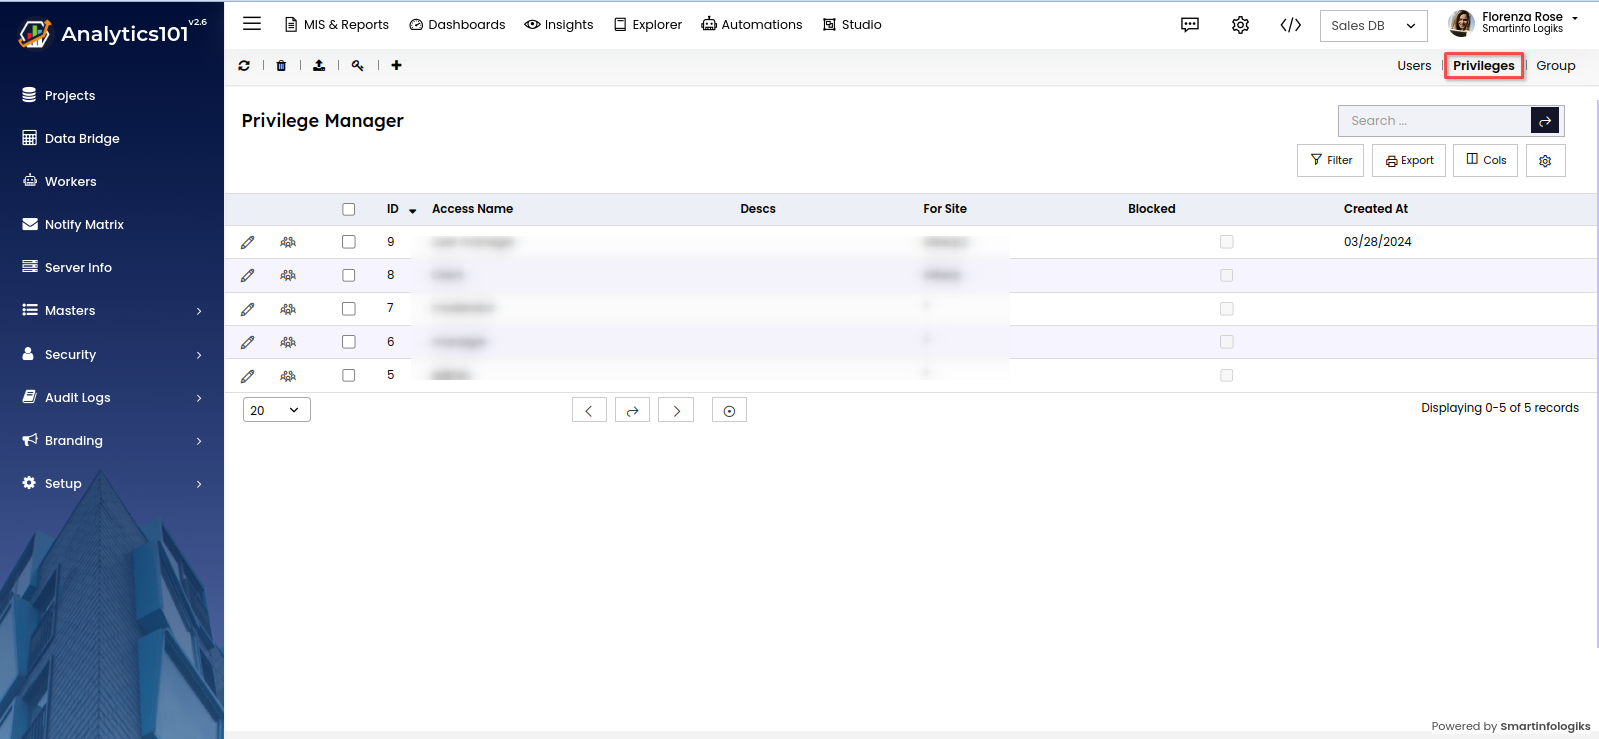
- To create a new privilege, click on the '+' icon. This action will display a New Privilege pop-up for creating the new privilege.
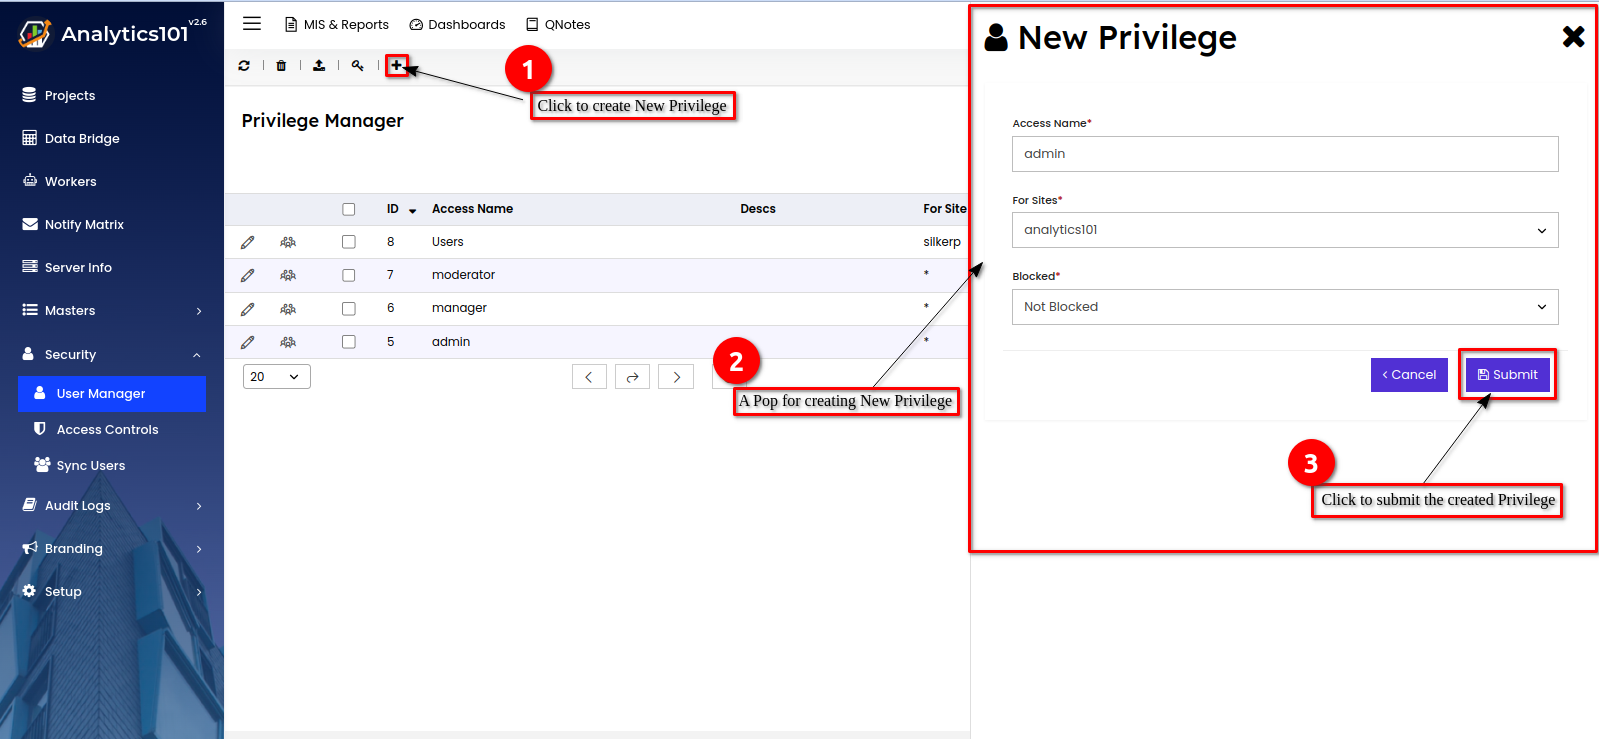
Enter the following details in the New Privilege pop-up.
Access Name : Enter the Privilege Name.
For Sites : Select the site.
Blocked : Select Blocked / Not Blocked - Click on 'Submit' button to create the Privilege.
- The created privileges will be listed in the 'Privileges' tab.
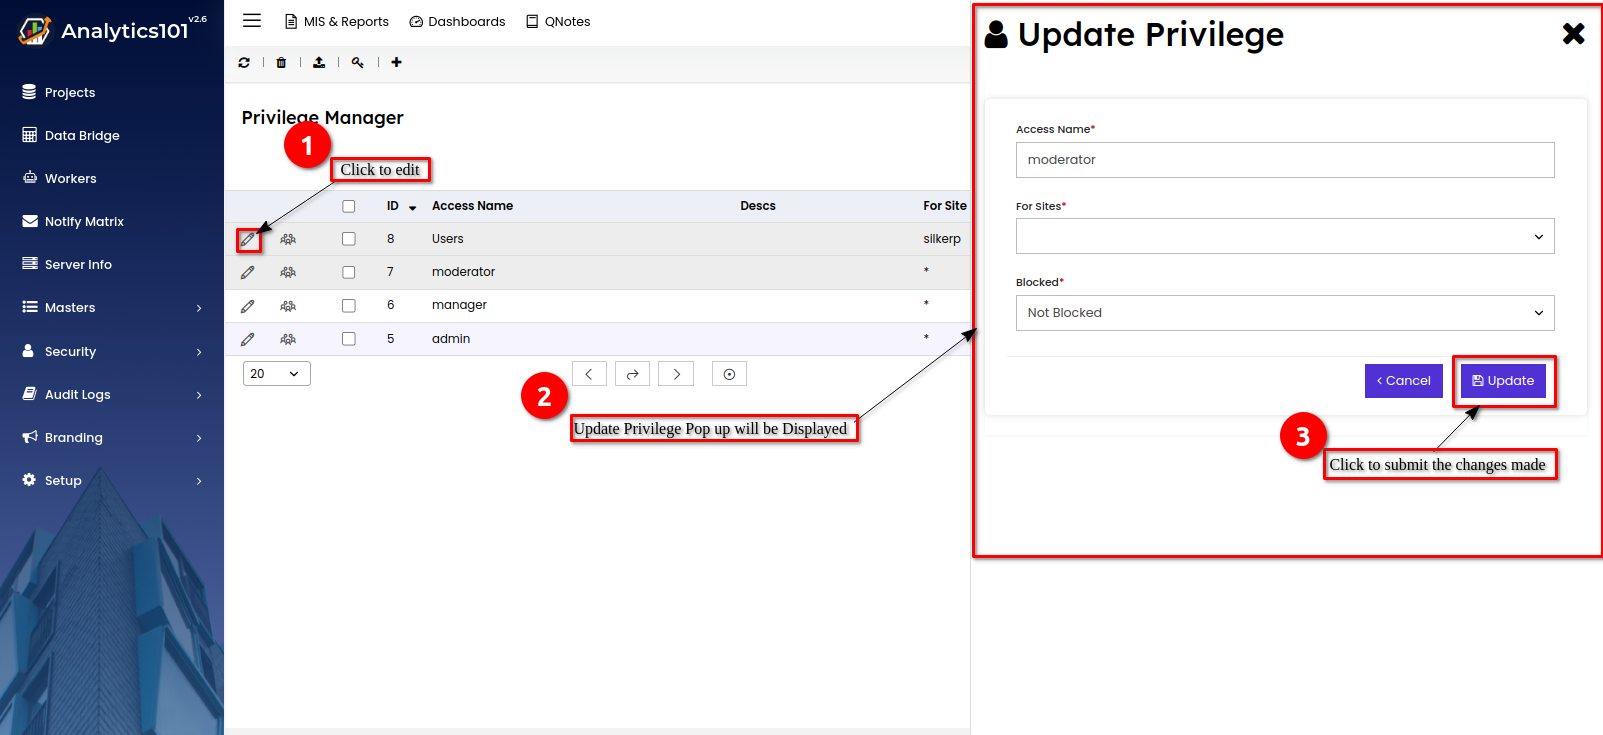
- To update the Privilege, click on the 'Edit' icon and make necessary changes in the 'Update Privilege' form. Once done, click the 'Update' button to save the changes.
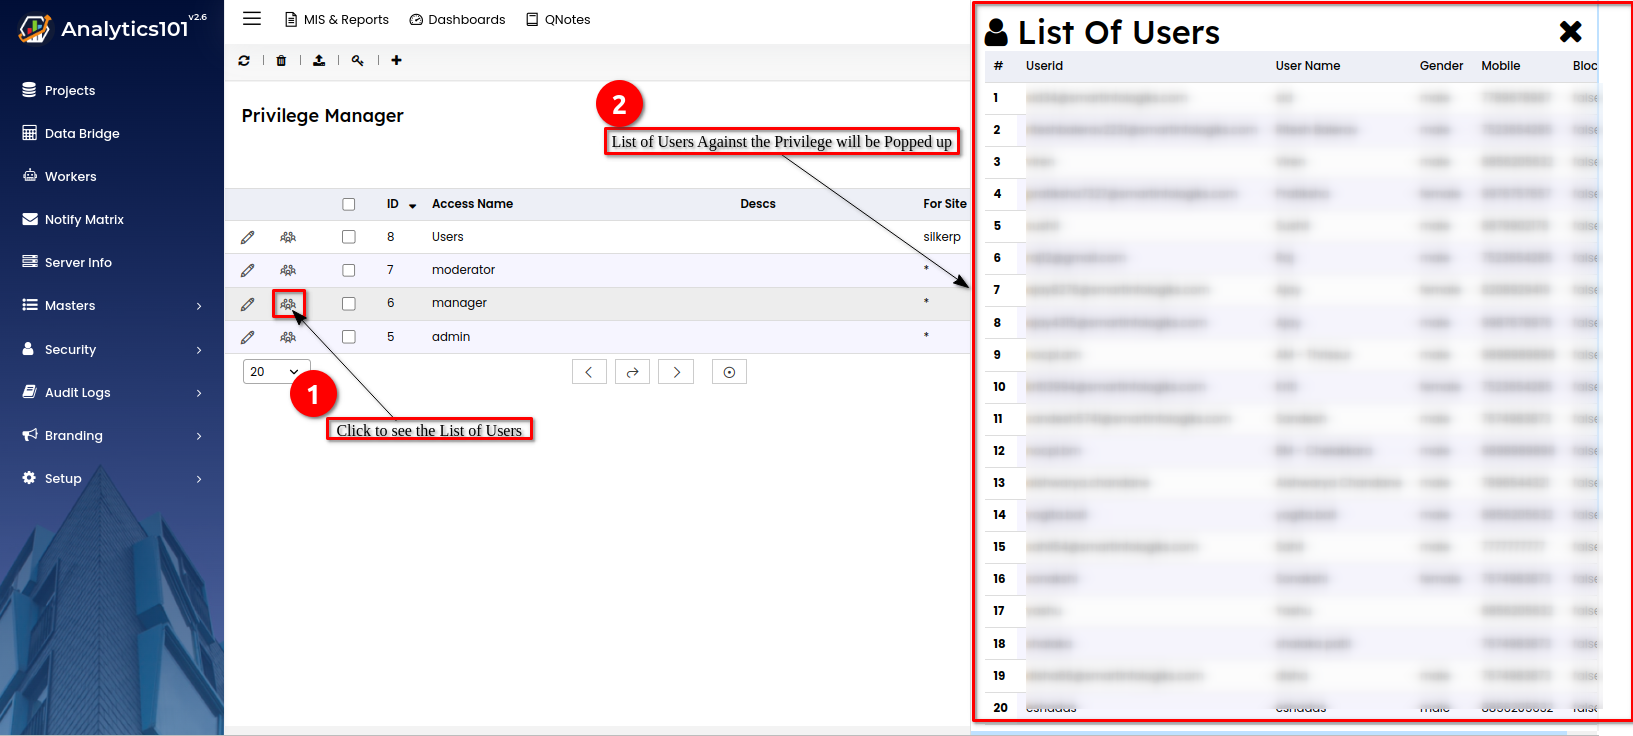
- To view List of Users against the Privilege, simply click on the 'Group' icon.
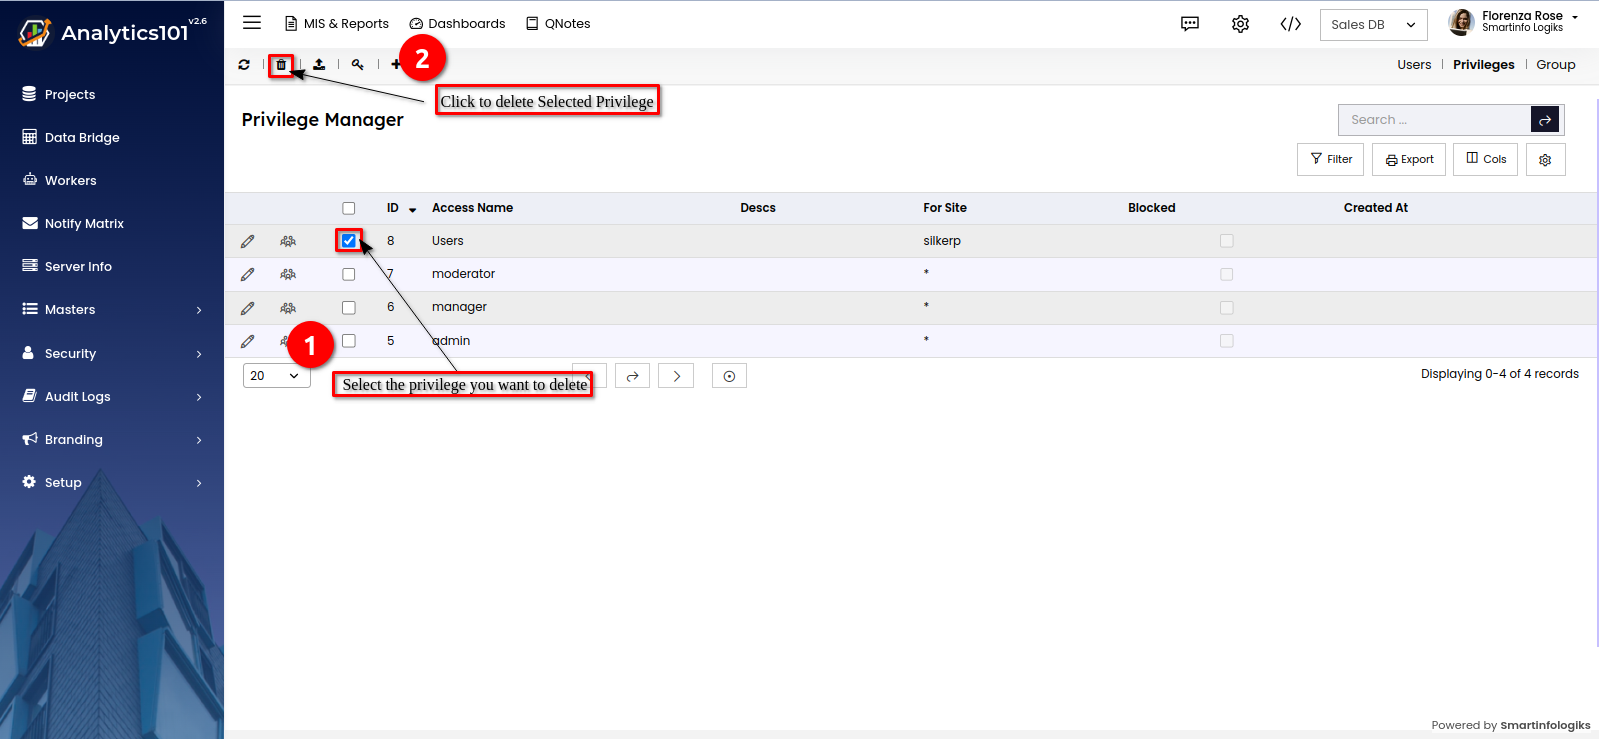
- To delete the created privilege, select the checkbox next to its name, then click on the delete icon.
