Staffs
- Staff management in system refers to the process of effectively and efficiently overseeing and administering an organization's workforce or staff using the features and functionalities provided by the ERP software.
- Maintain a centralized database of employee information, including personal details, contact information, qualifications, employment history, and skills. This ensures that HR and management have easy access to up-to-date employee data.
Steps:-
- Goto the HR
- Then Go to the Staffs Module.
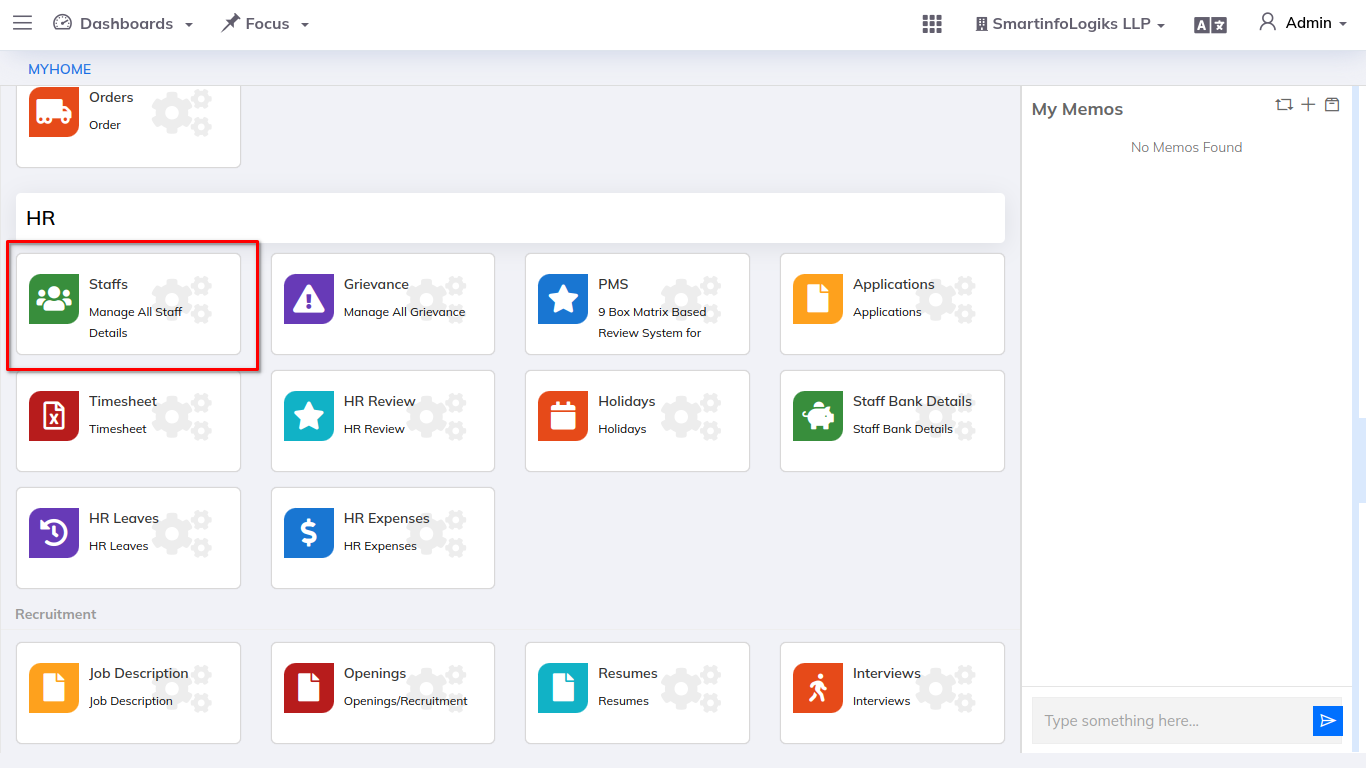
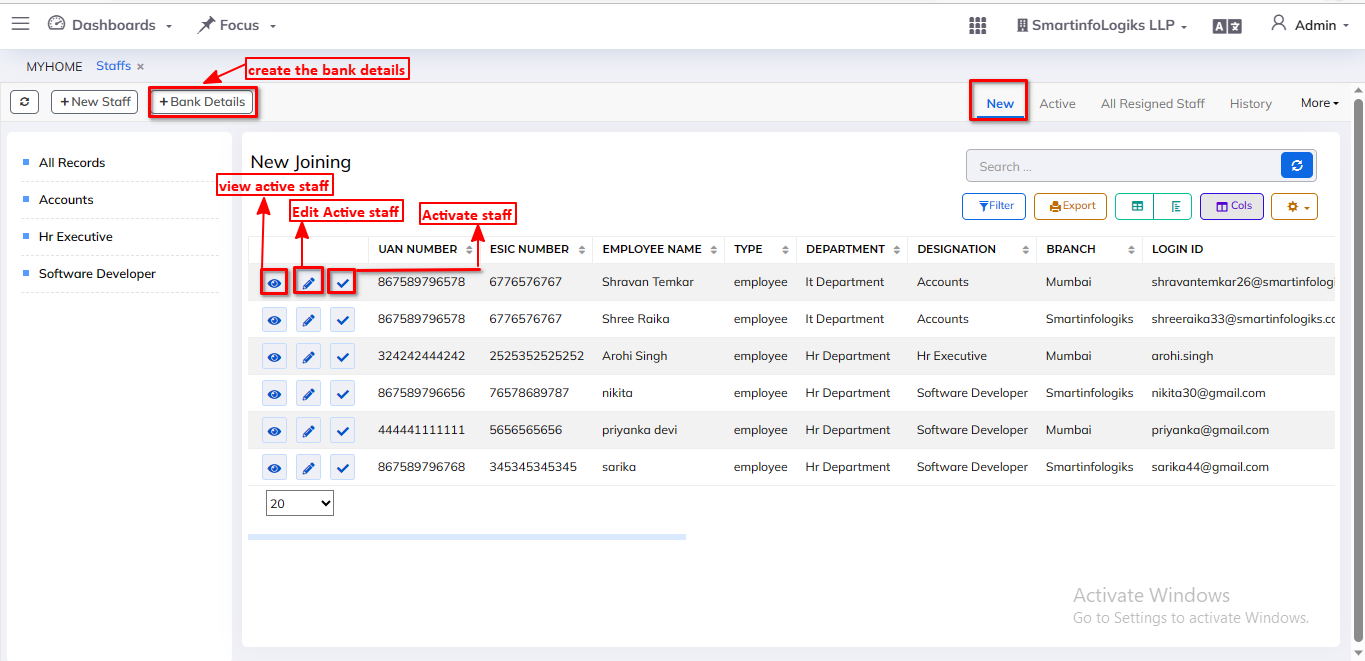
- After clicking on staffs module, user will be redirect to the Active tab as shown in below image.
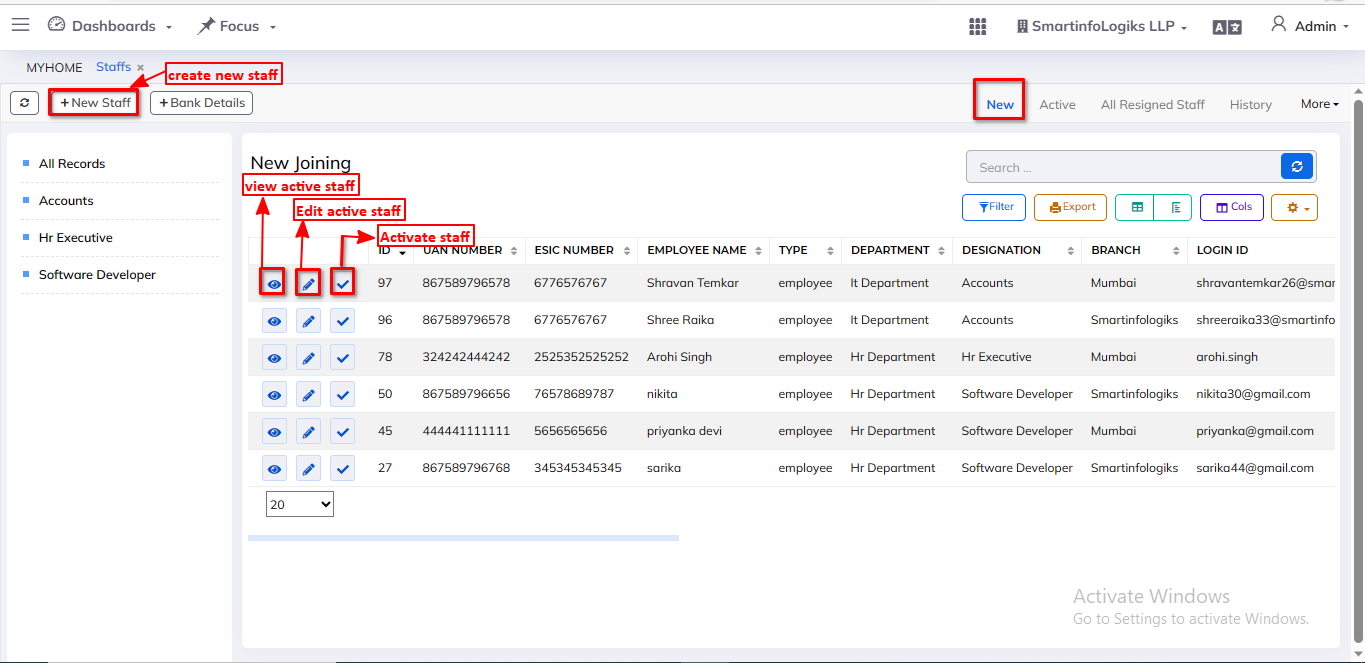
4.1.New tab:-
- Information of each staff is managed in new tab.
- Using the Side bar filter, you can easily Designation wise find information about a specific position.
- After that, the employee will become active by clicking the "activate staff" button.
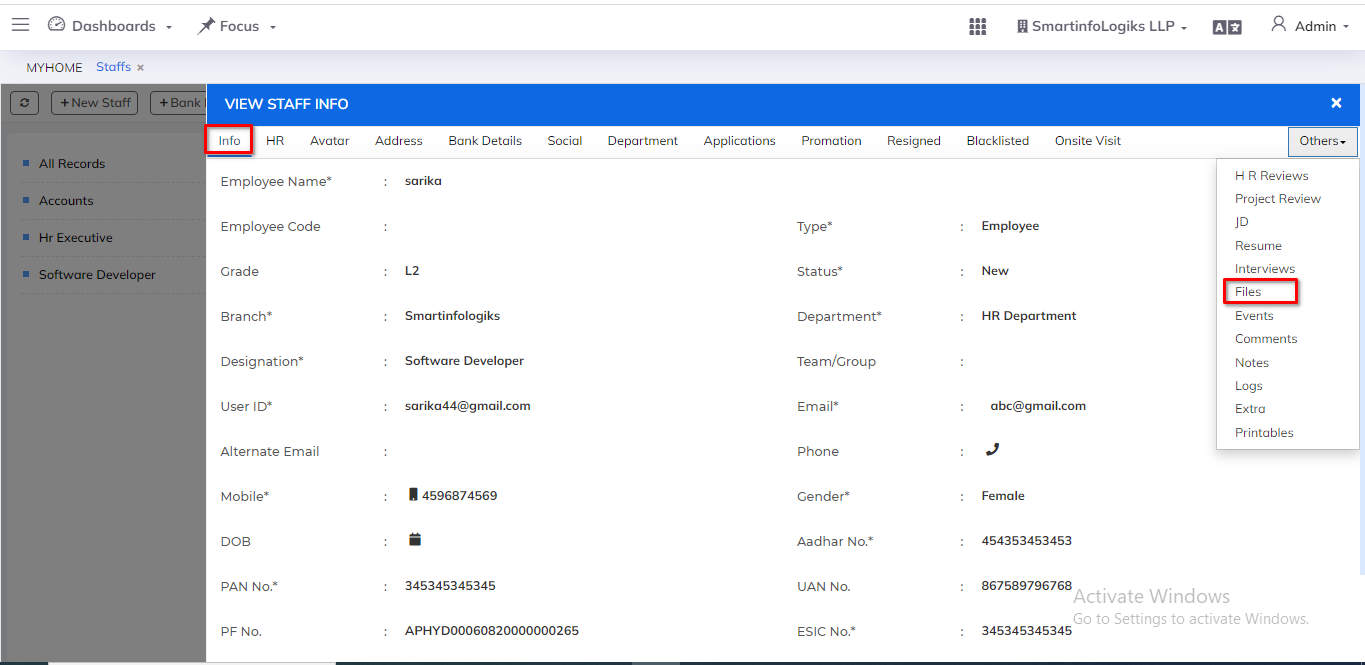
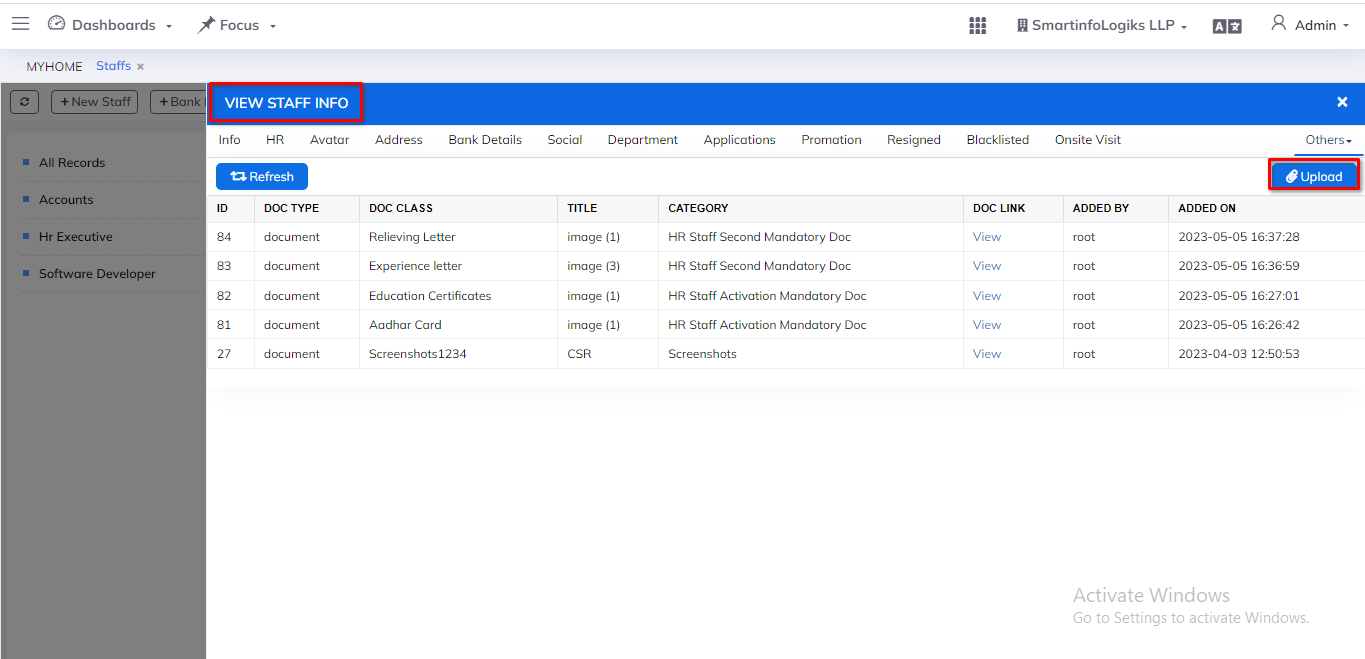
- After clicking on Active Staff, Popup Message is given that Please upload the document as shown below image
- Select "View Staff Info" and then Upload Document from File.
- Upload the document as shown in the below image for the activation staff.
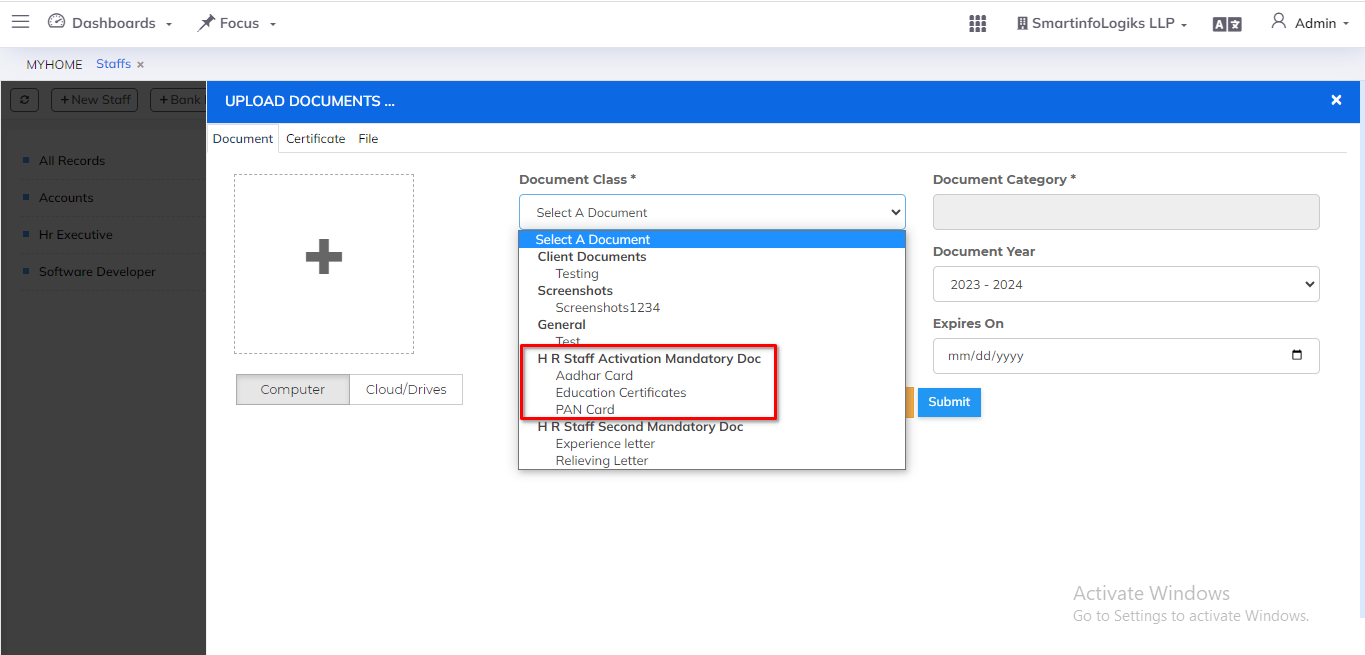
- Then upload the document as shown in the below image.
4.1.1 New Staffs:-
Steps:- - Go to the Menu List.
- Click on HR Module
- Then Go to the Staffs tab.
- Click on New tab → Click on Add Staff.
- New tab will be shown as below image:-
- Click on info tab form will be open as below image:-

- Enter all required details:-
1.Employee Name: Enter Employee name.
2.Type: We Can Choose the type of contractual,Employee,and Intern. Select Type using dropdown.
3.Branch:we Can Choose the branch name i.e smartinfologiks,Mumbai and Delhi.Select Branch using dropdown.
4.Grade: We Can Choose Employee Level i.e L1 and L2 .Select Grade using dropdown
5.Department:We Can Choose Department i.e Account,HR,IT,Marketing,Nurse,SEO and Media and Tech Sales. Select Department using dropdown.
6.Designation: We Can Choose Designation For ex.Software Tester,Software Developer,Project Manager and HR Executive. Select Designation using dropdown.
7.Team /Group: Enter the team/group name.
5.User ID: Enter the valid User id.
6.Email: Enter the valid Email id.
7.Mobile: Enter the valid Mobile no.
8.Gender: We Can Choose the Gender i.e Female and Male.Select Gender using dropdown.
9.Employee Code: Enter the Employee code.
10.Alternate Email: Enter the Alternate Email.
11.Phone: Enter the Phone no.
12.DOB: Enter the Date of birth date.
13.Aadhar No: Enter the valid Aadhar number.
14.PAN No: Enter the valid PAN number.
15.UAN No: Enter the valid UAN number.
16.PF No: Enter the valid PF number.
17.ESIC No: Enter the valid ESIC Number.
18.Tags: Enter the Tags.
19.Remarks: Enter the Remarks. - After filling all the mandatory fields click on the Submit button. On click of submit, the Project will be added successfully.
- Click onHR tab form will be open as below image:-

- Enter all required details:-
1.Job Description: Select job description using searching dropdown
2.Opening: Select Opening using searching dropdown.
3.Resume: Select Resume using searching dropdown.
4.Interview Name: Select Interview Name using searching dropdown.
5.Joining Date: Select the joining date using calender.
6.Probation End Date: Select the probation End Date using calender. - After filling all the mandatory fields click on the Submit button. On click of submit, the Project will be added successfully.
- Click onAvatar tab form will be open as below image:-
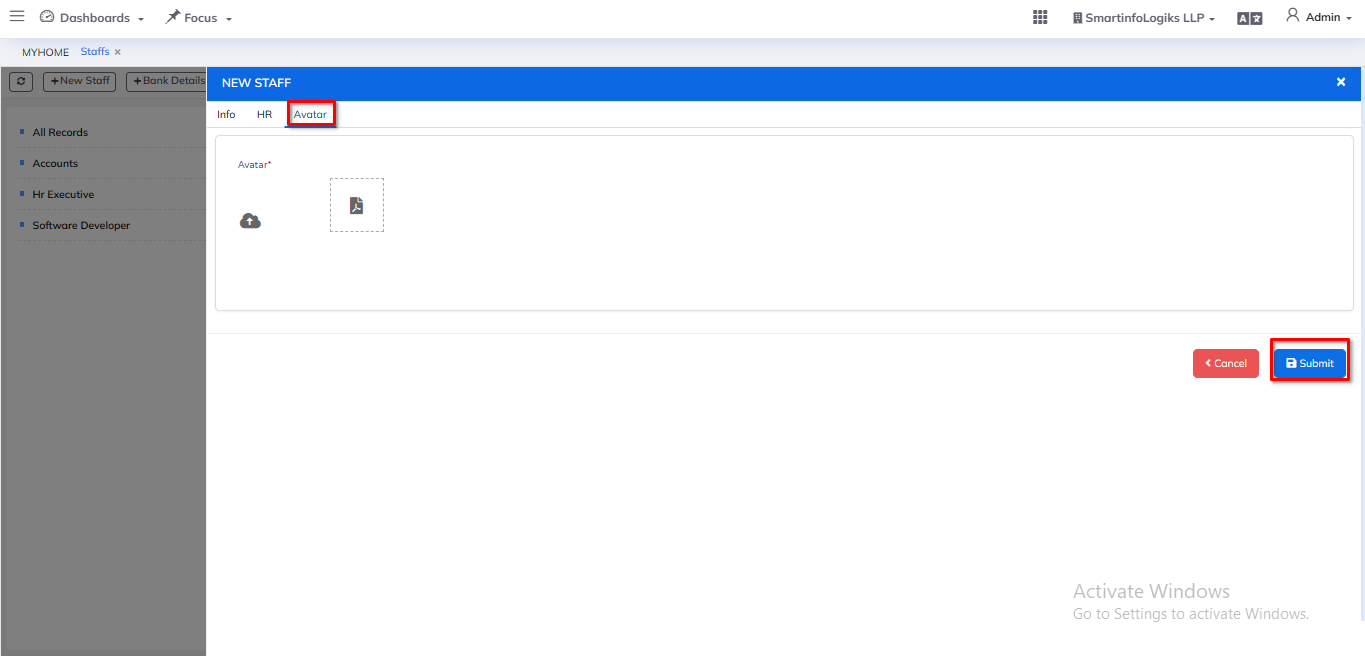
- Enter all required details:-
Avatar: Upload the Avatar. - After filling all the mandatory fields click on the Submit button. On click of submit, reports will be added successfully.
- Added staff is displayed in Reports as shown in the below image.
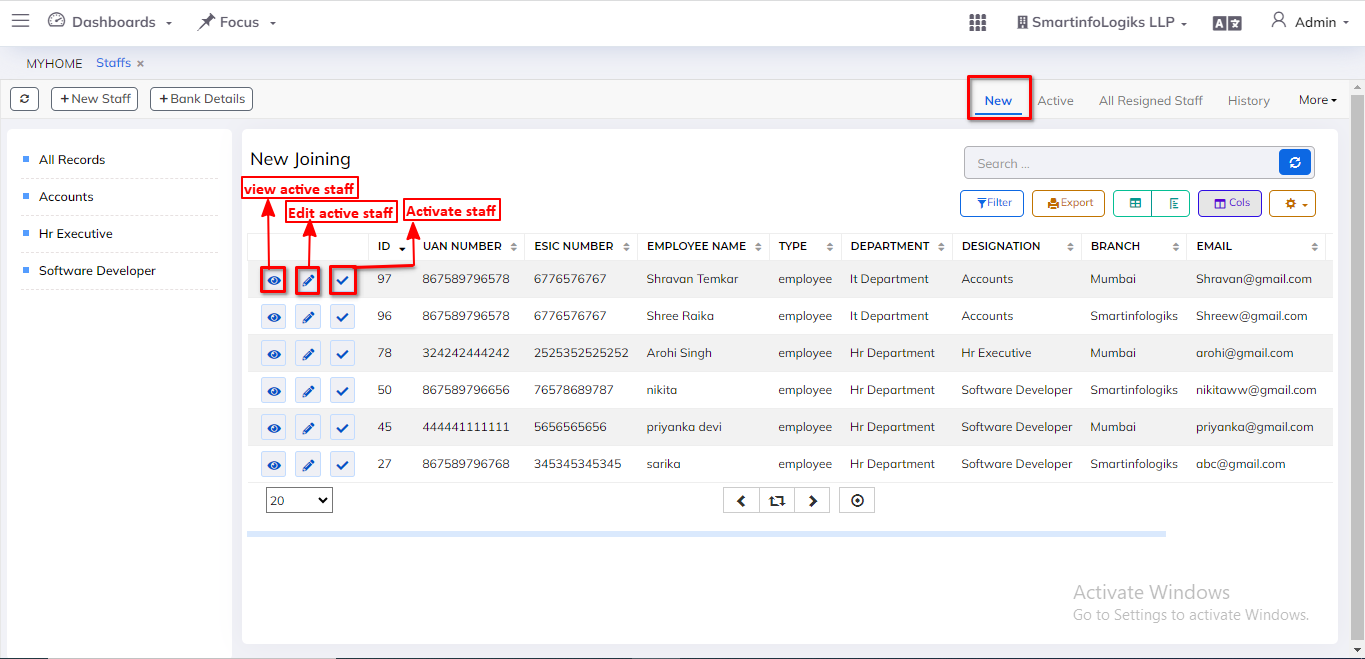
- On click of the View Active Staff icon, users can view the staff.
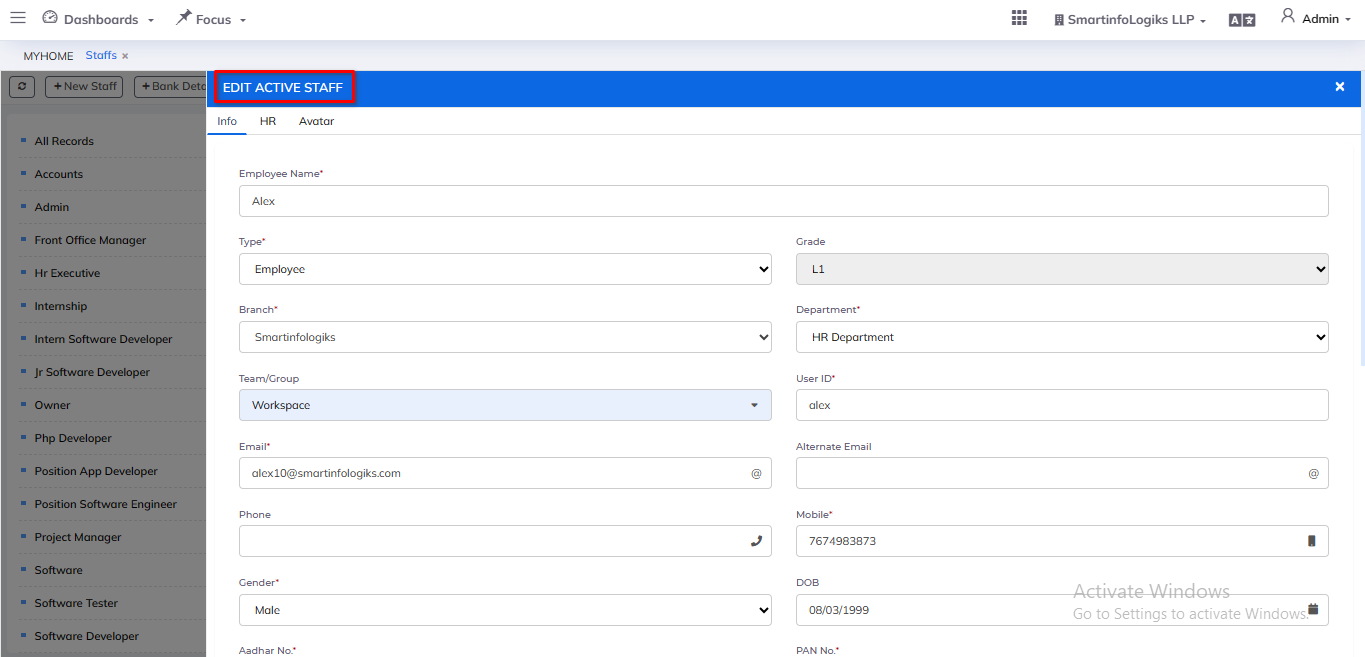
- On click of the Edit Active Staff icon, users can edit staff.
- On click of the Activate Staff icon,user can view activate staff in active tab.
4.1.2 Bank Details:-
- Bank details We can get information from staff, and we can also get information from staff bank details.
- Click on New tab → Click on Add Bank Details.
- New tab will be shown as below image:-
- Click on info tab form will be open as below image:-
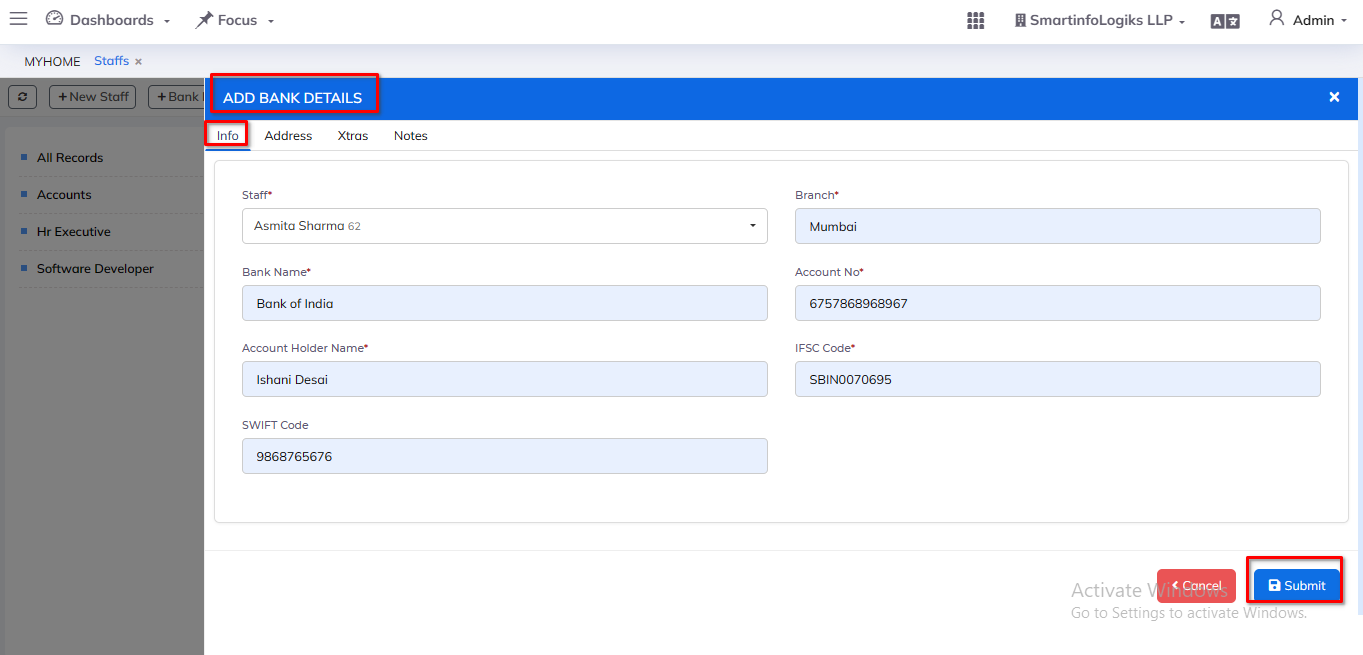
- Enter all required details:-
1.Staff: Select the staff name using searching dropdown.
2.Branch: Enter the Branch Name
3.Bank Name: Enter the Bank Name
4.Account No: Enter the Account number
5.Account Holder Name: Enter the Account Holder Name
6.IFSC Code: Enter the IFSC Code
7.SWIFT Code: Enter the SWIFT Code - After filling all the mandatory fields click on the Submit button. On click of submit, the Project will be added successfully.
- Click on Address tab form will be open as below image:-
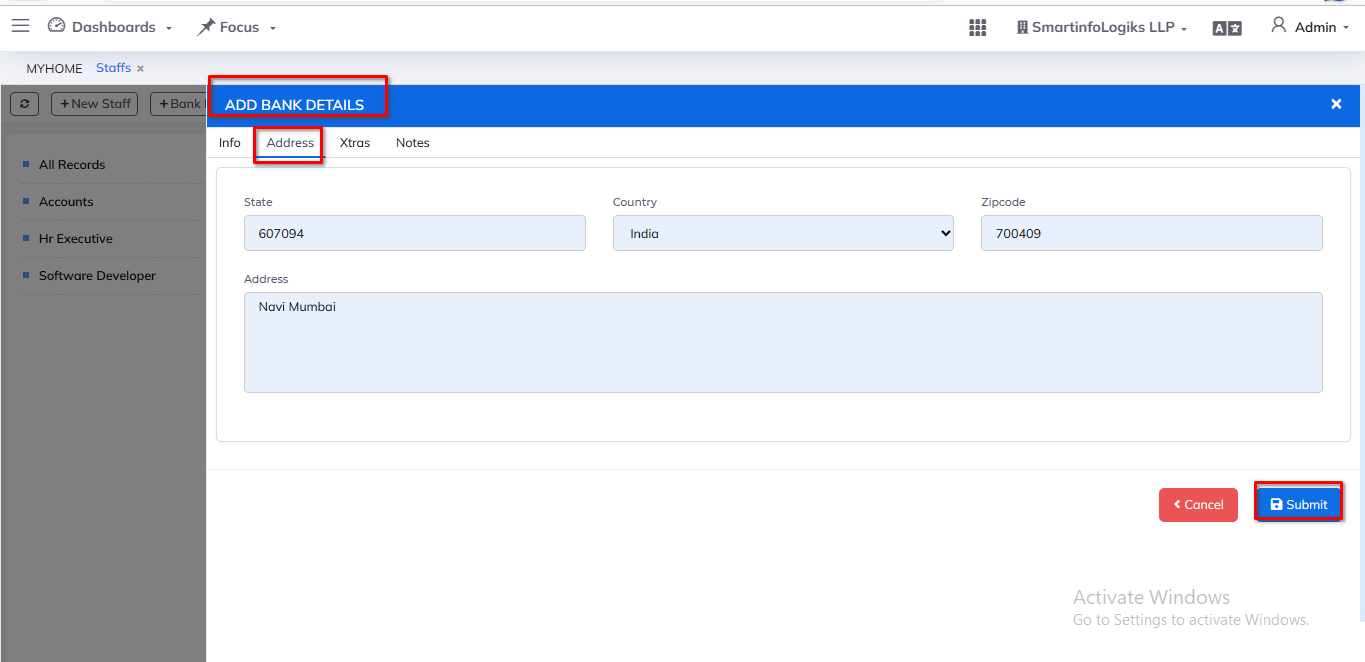
- Enter all required details:-
1.State: Enter the state.
2.Country: Enter the Country.
3. Zipcode: Enter the Zipcode.
4. Address: Enter the Address. - After filling all the mandatory fields click on the Submit button. On click of submit, the Project will be added successfully.
- Click on Xtras tab form will be open as below image:-
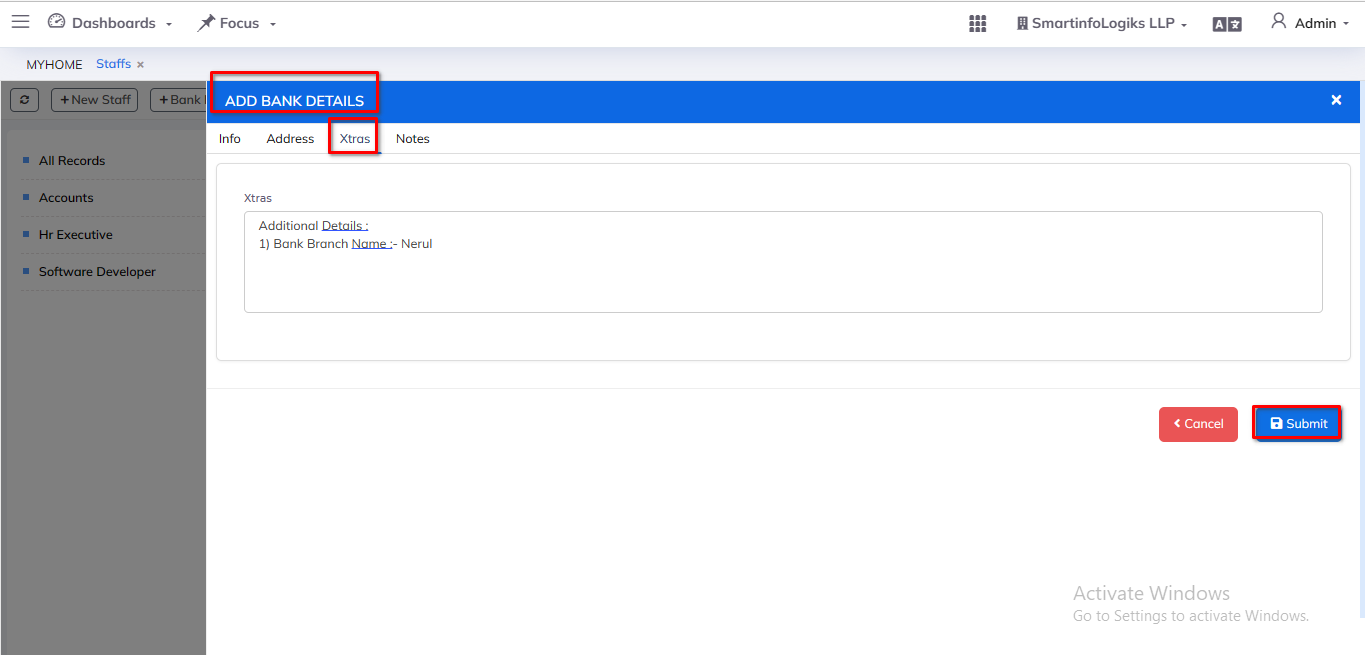
- Enter all required details:-
1.Xtras: Mention the bank related information. Enter the xtras. - After filling all the mandatory fields click on the Submit button. On click of submit, the Project will be added successfully.
- Click on Notes tab form will be open as below image:-
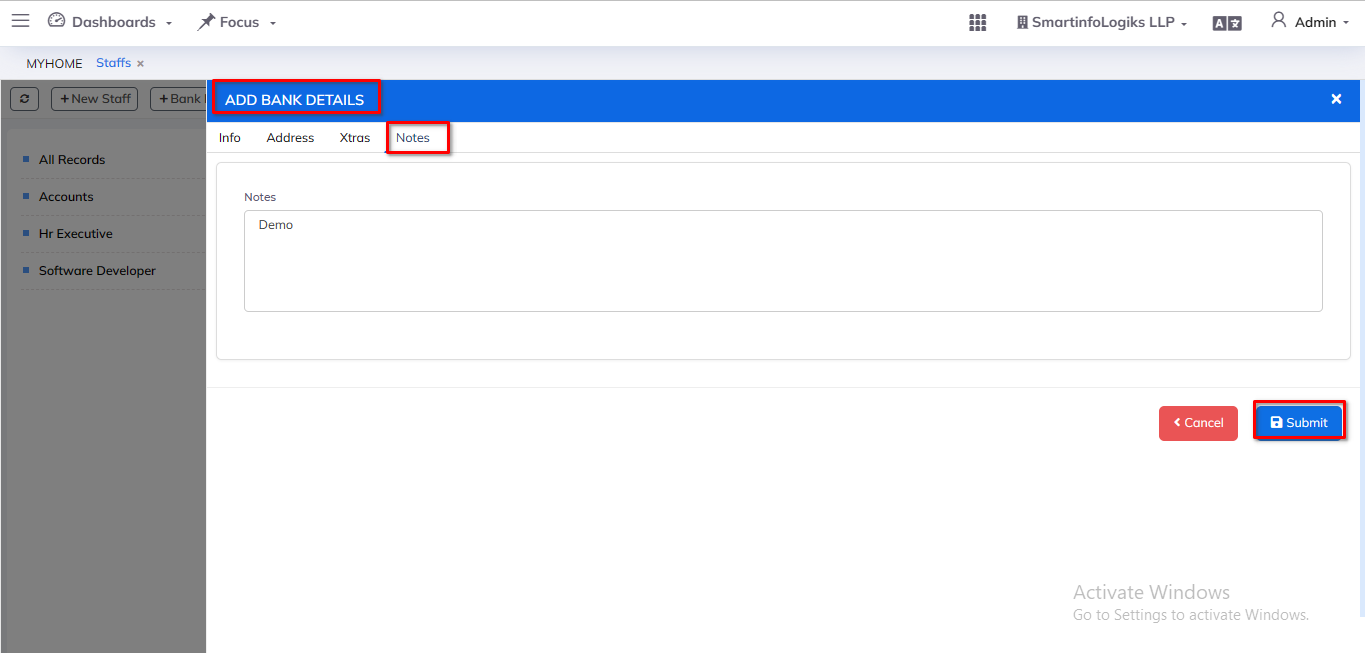
- Enter all required details:-
1.Note: Enter the Notes.The bank can describe the rest of the information in the details. - After filling all the mandatory fields click on the Submit button. On click of submit, the Project will be added successfully.
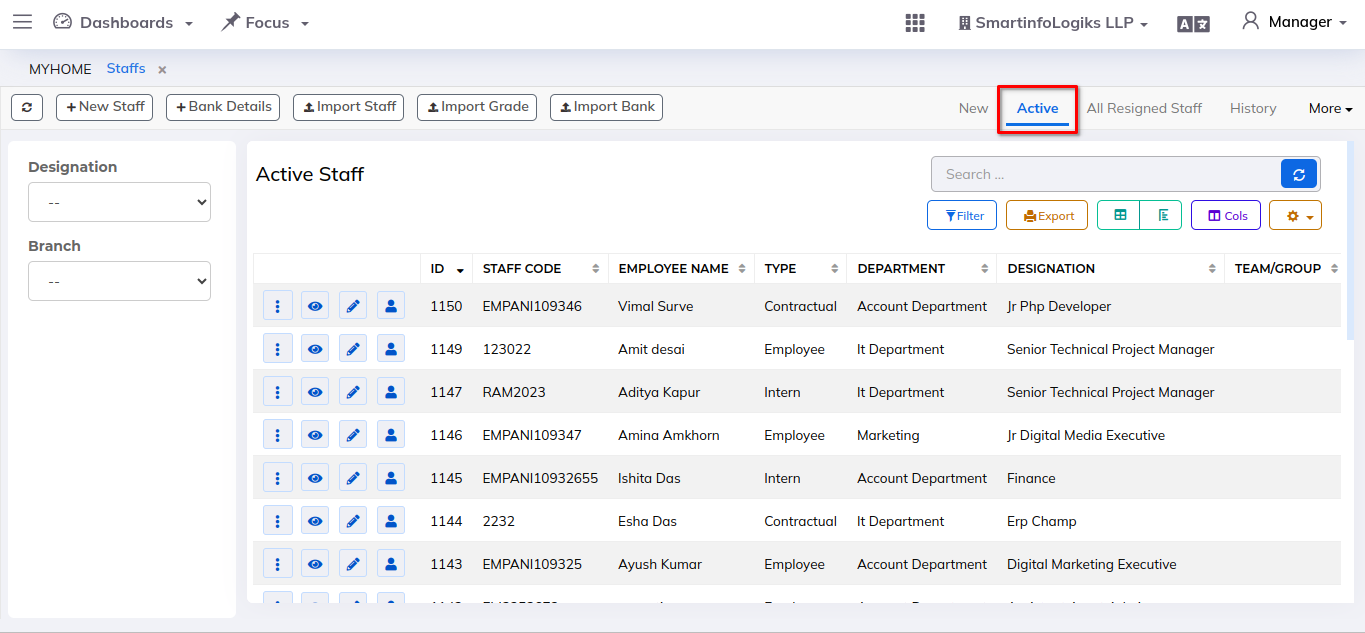
4.2.Active tab:-
- After clicking on active staff icon in new tab, as probation status appears in active tab.
Steps:- - Click on HR Module
- Then Go to the Staffs tab.
- Click on the Active Tab
- In Active tab will be shown as below image:-
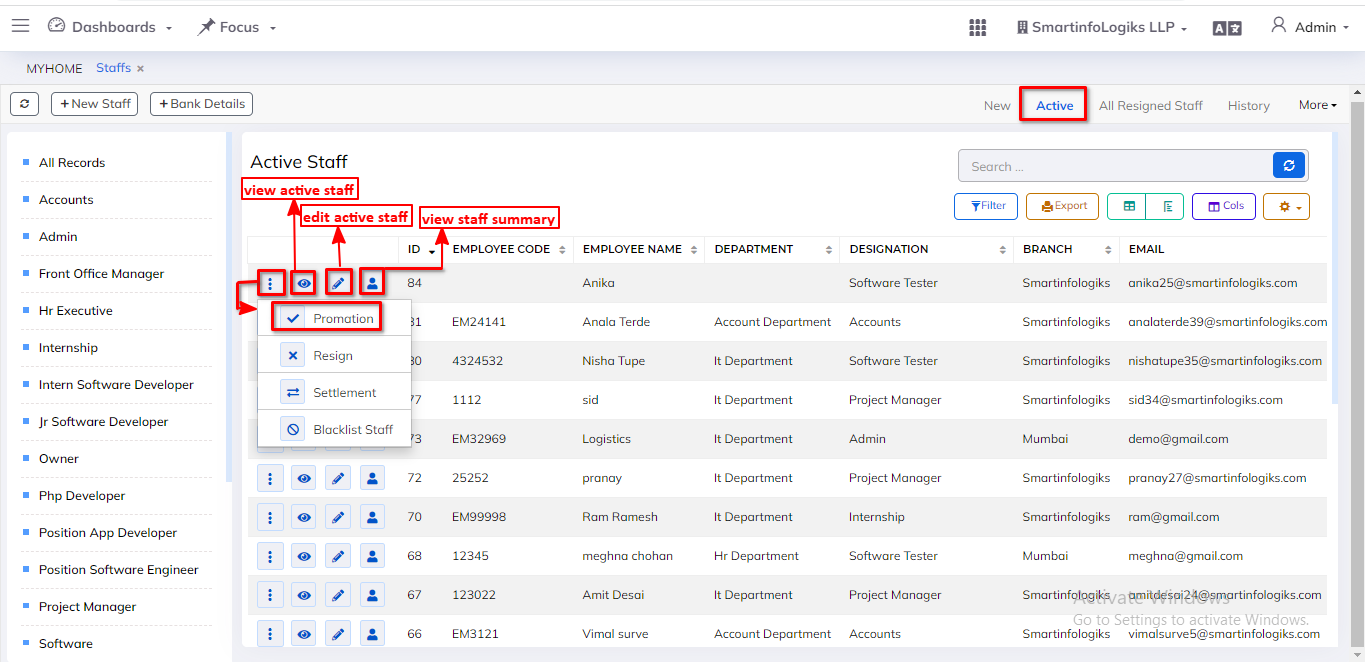
- The active status then changes immediately as you click the promotion button in the active tab.
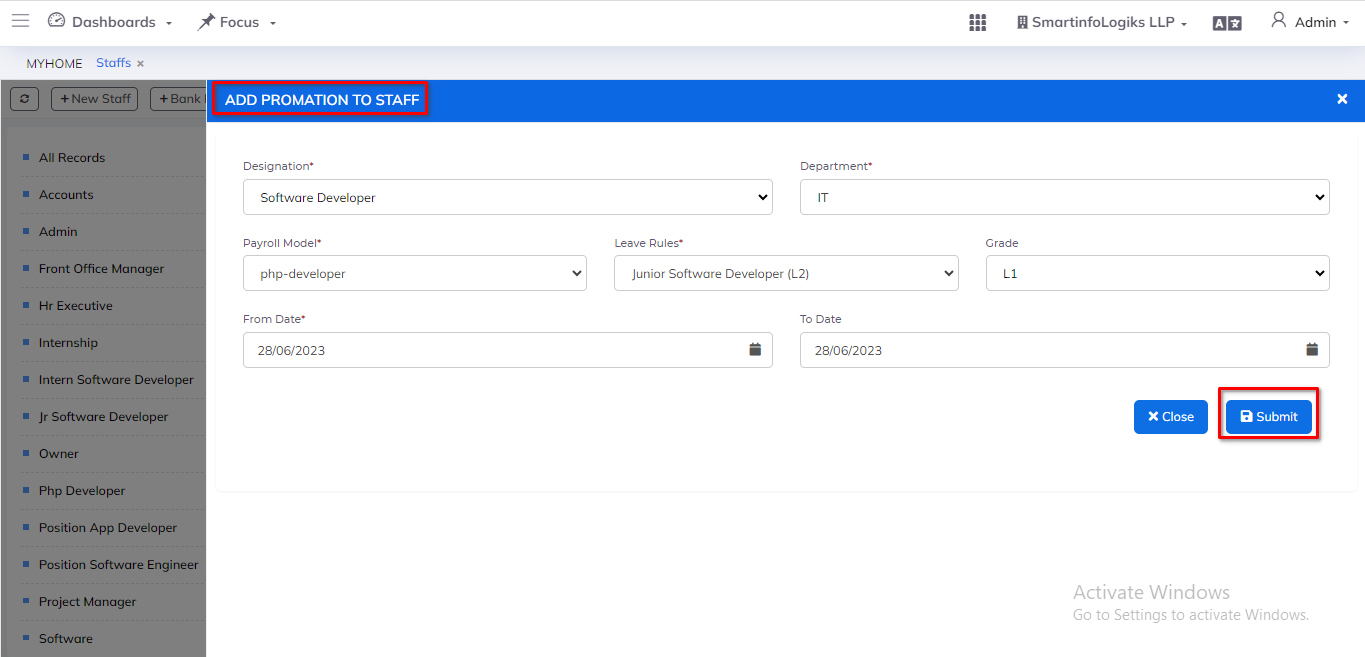
- Enter the all reqiured field:-
1.Designation: Select the Designation using dropdown.
2.Department: Select the Department using dropdown.
3.Payroll Model: Select the Payroll Model using Dropdown.
4.Leave Rules: Select the Leave Rules using dropdown.
5.Grade: Select the Grade using dropdown
6.From Date: Select the From Date using calender
7.To Date: Select the To Date using Calender - After filling all the mandatory fields click on the Submit button. On click of submit, the Project will be added successfully.
- When you click the Resign Employee button in the Active tab, the status in the More tab moves to the All Resigned Staff tab.
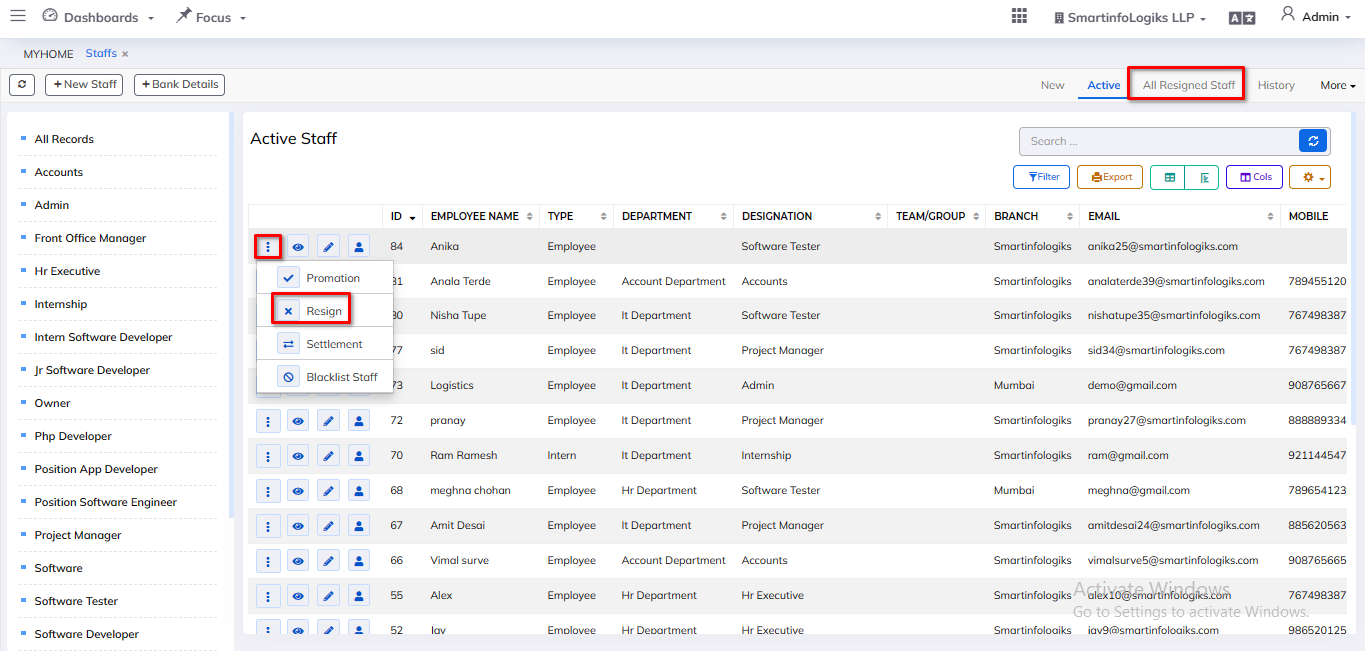
- When you click the Blacklist Staff button in the Active tab, the status in the More tab goes to Blacklist Staff.
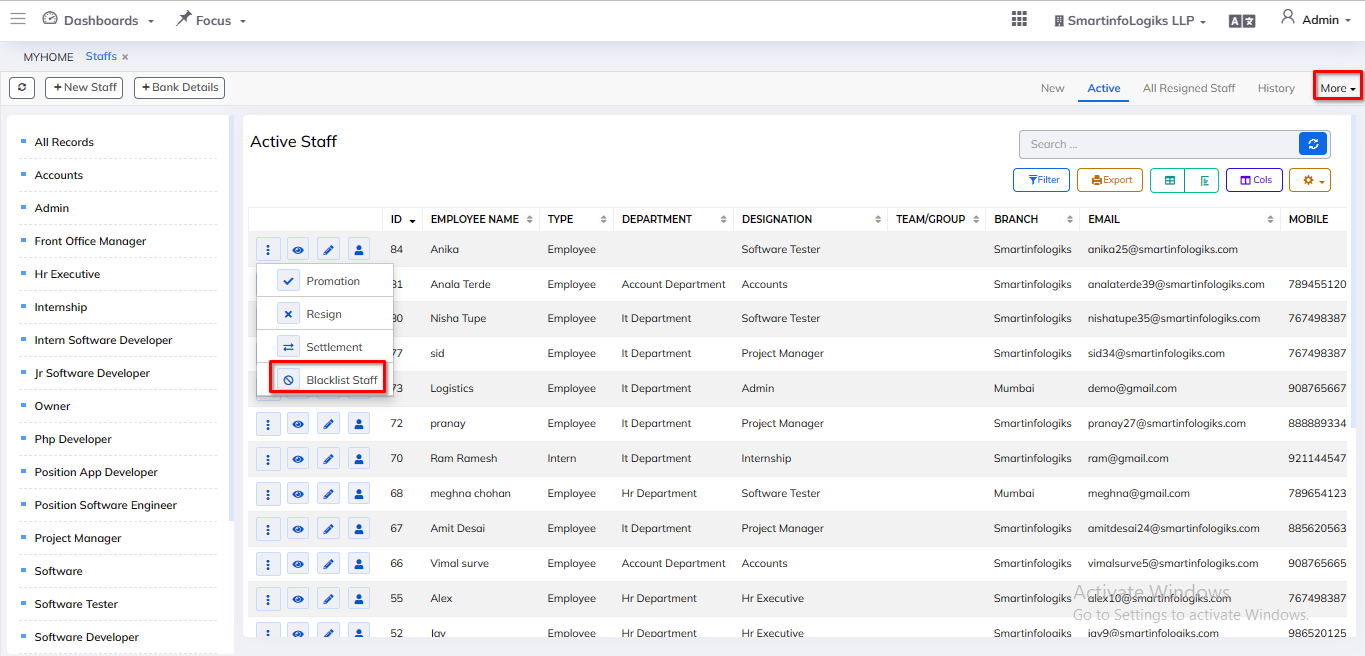
- On click of the Three dot like icon, users can Status wise View Promotion staff,Resign staff and Blacklist staff details.
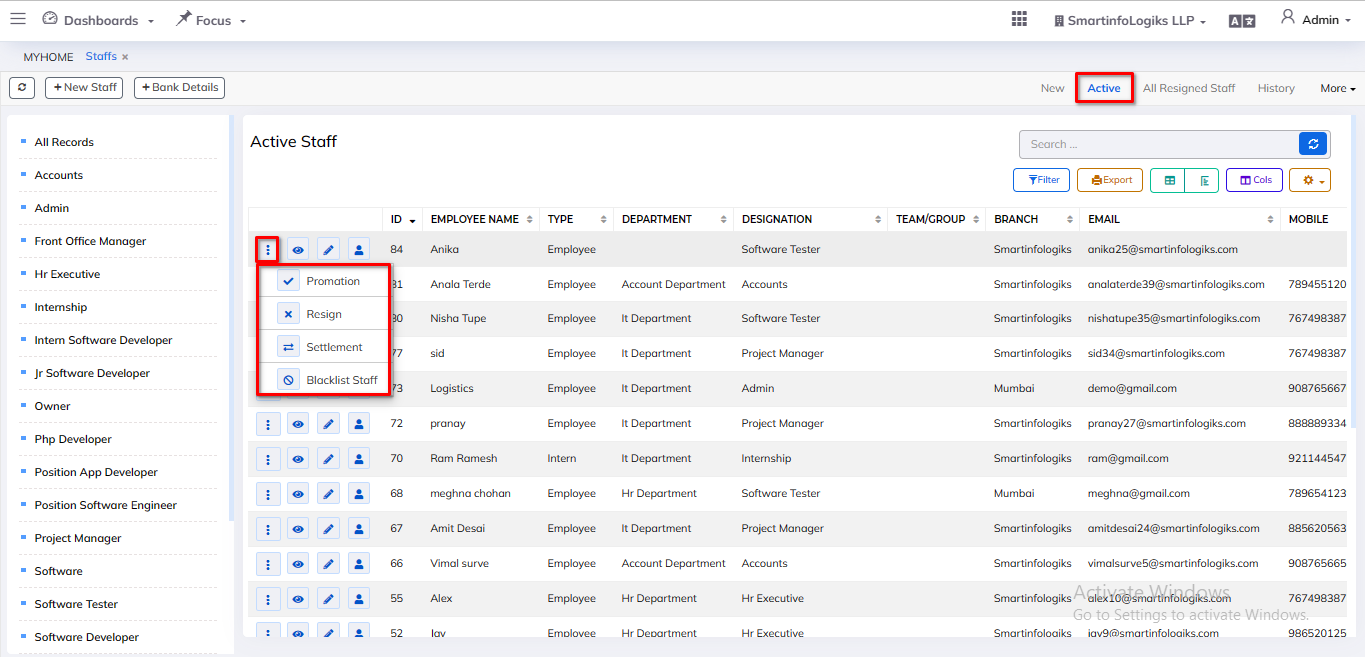
- On click of the View Active Staffs icon, users can View Active staffs details.
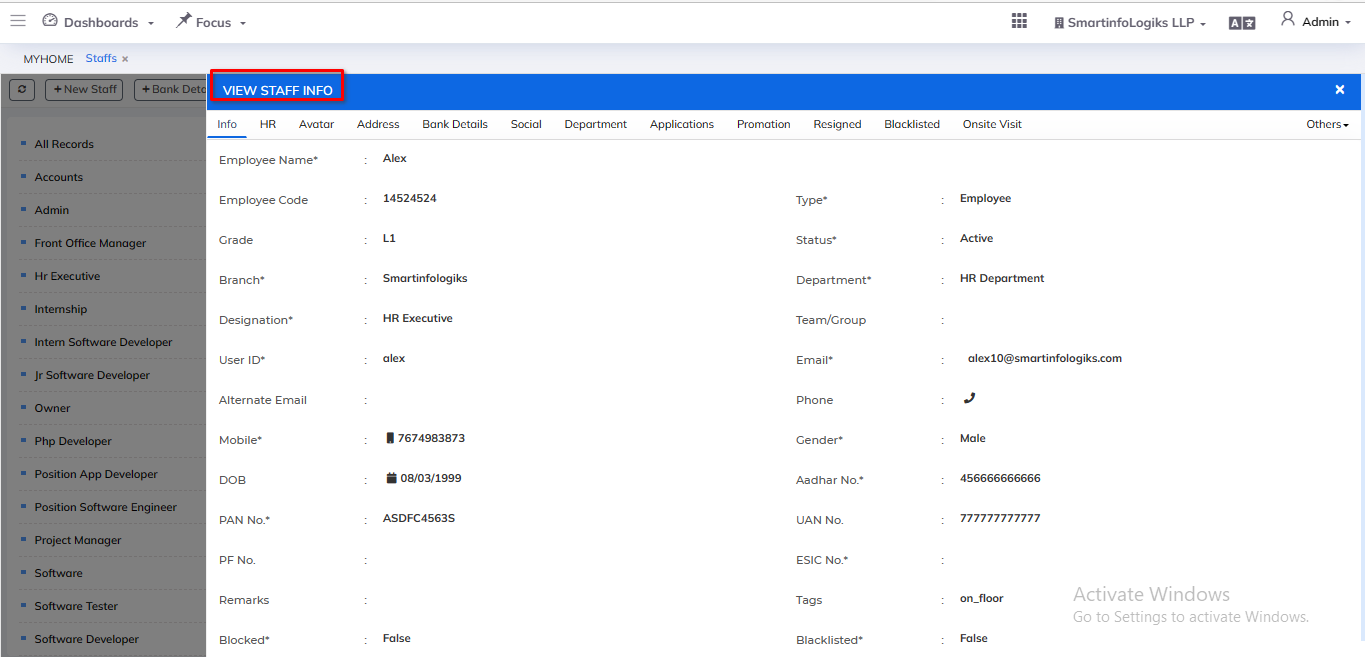
- On click of the Edit Active Staffs icon, users can Edit Active staffs details.
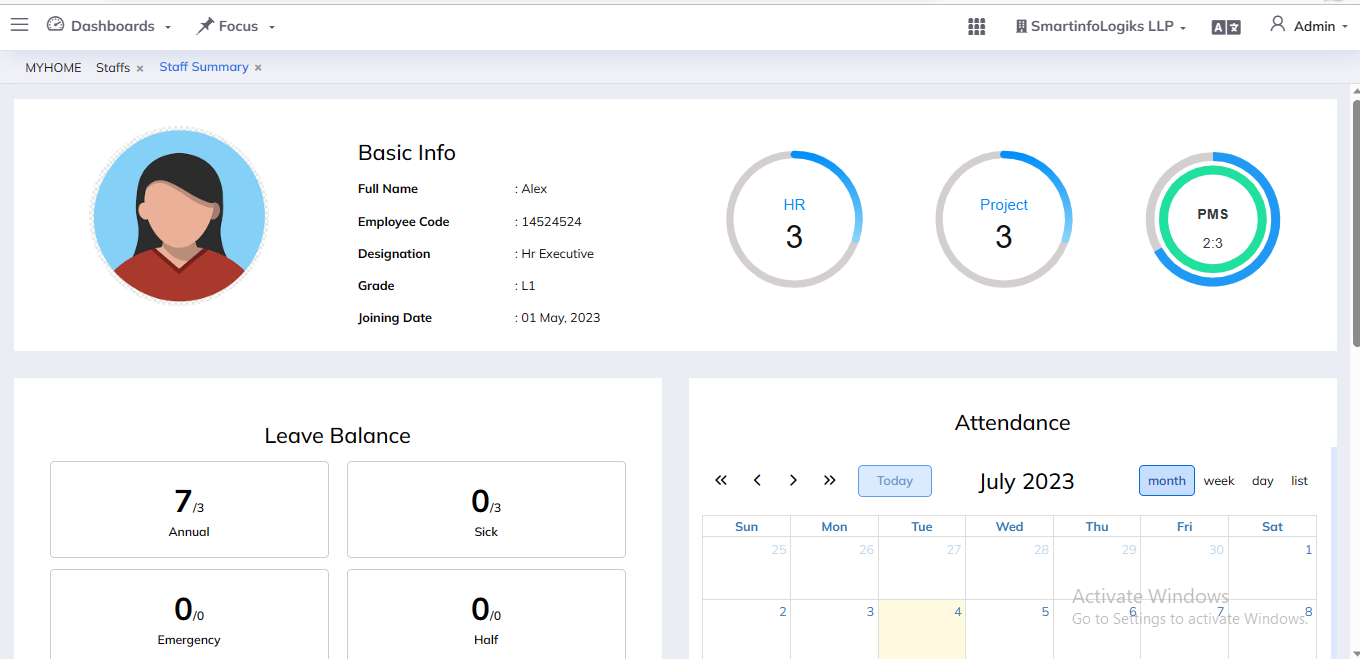
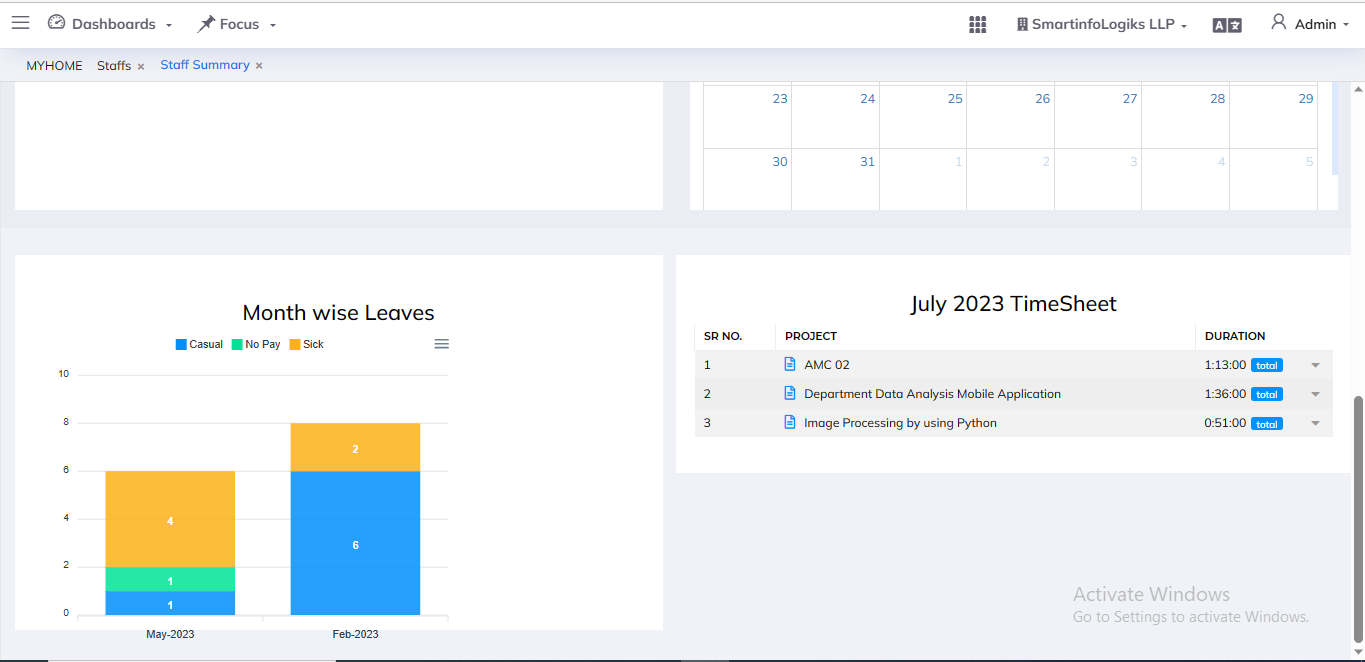
- On click of the View Staff Summary icon,users to view staff performance details for projects, HR, and PMS.
4.3.All Resigned Staff Tab:-
- All Resigned tab shows status under notice staff.
- All resigned employees can access their data by clicking the "inactive staff" icon, which takes them to the "history" tab.
Steps:- - Click on HR Module
- Then Go to the Staffs tab.
- Click on the All Resigned Staff Tab
- In All Resigned Staff tab will be shown as below image:-

- On click of the View Active Staffs icon, users can View Active staffs details.
- On click of the View Staff Summary icon,users to view staff performance details for projects, HR, and PMS.
- On click of the Inactive Staff icon, user can view in report under notice status wise staff.
4.4. More Tab:-
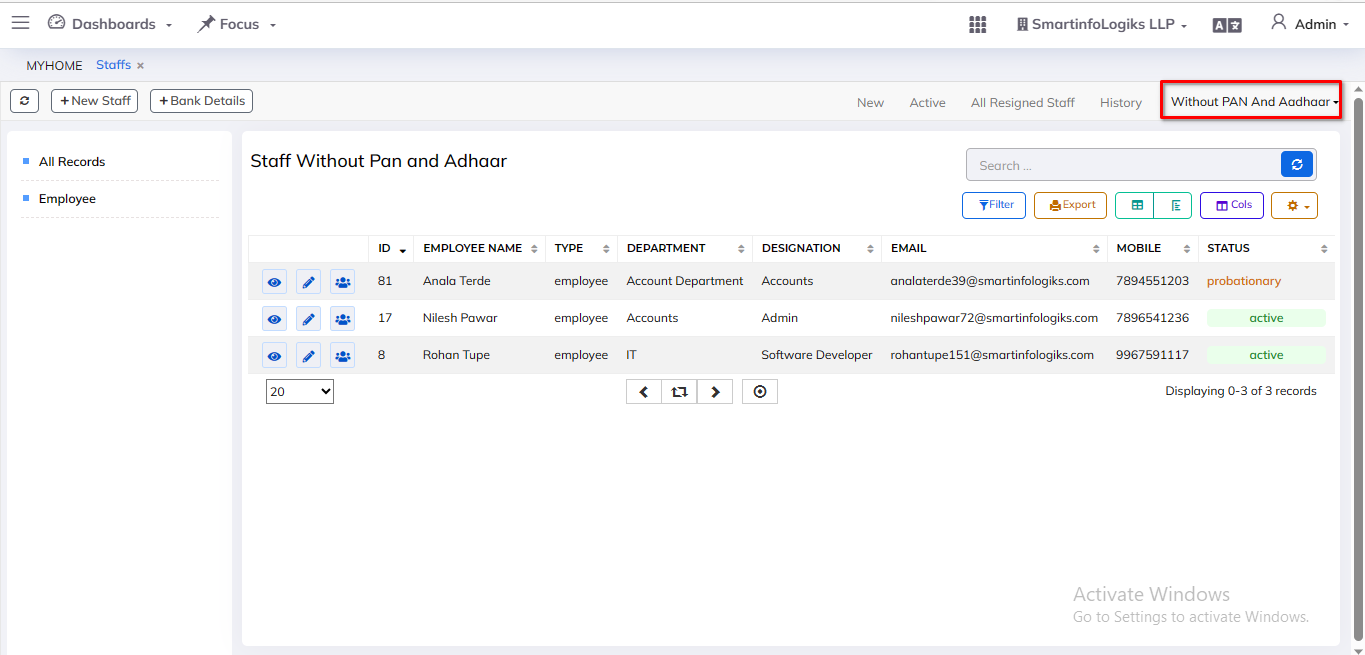
- If the employee does not have Aadhaar or the above document, the information about that employee is displayed in the More tab.
- Using the Side bar filter, you can easily Designation wise find information about a specific position.
Steps:- - Click on HR Module
- Then Go to the Staffs tab.
- Click on the More Tab
- In More tab will be shown as below image:-

- If you don't have a PAN or Aadhaar number, click the More tab to view the data about that employee.
- If the document is not uploaded in the view, then the staff data is visible
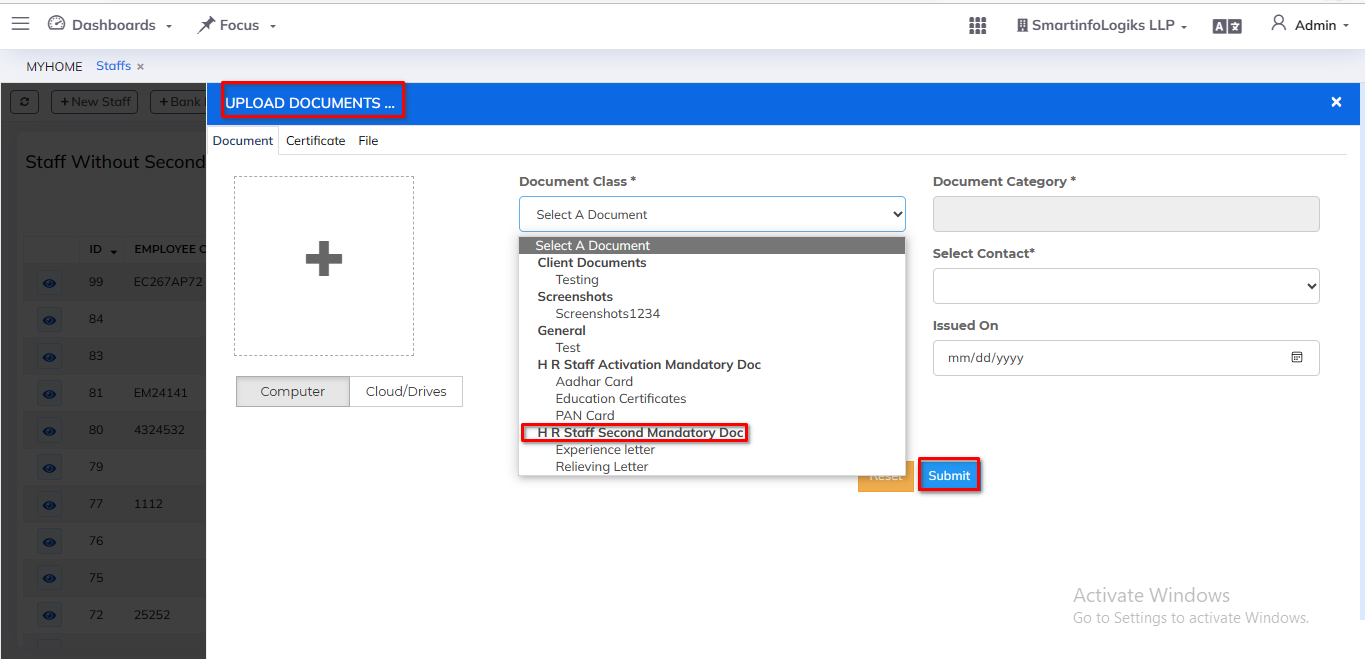
- If you don't have second Mandatory documents ,click the More tab to view the data about that employee.
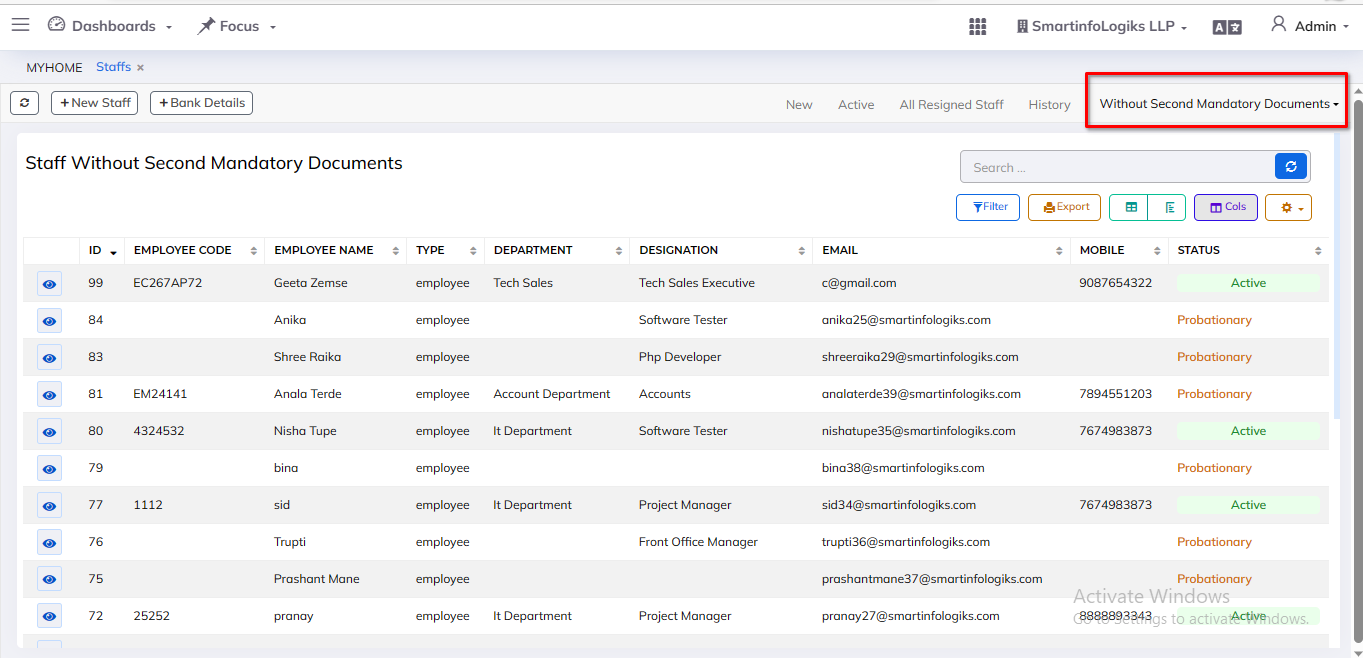
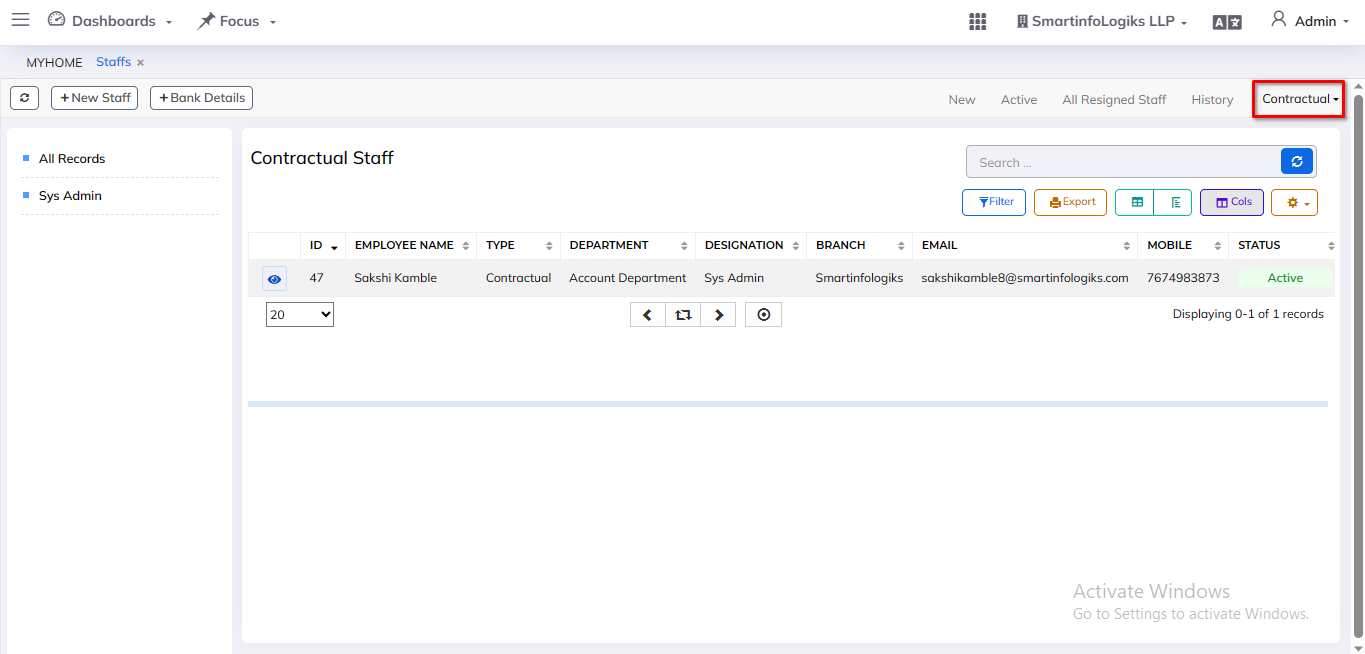
- More tabs show the data of contractual employees.
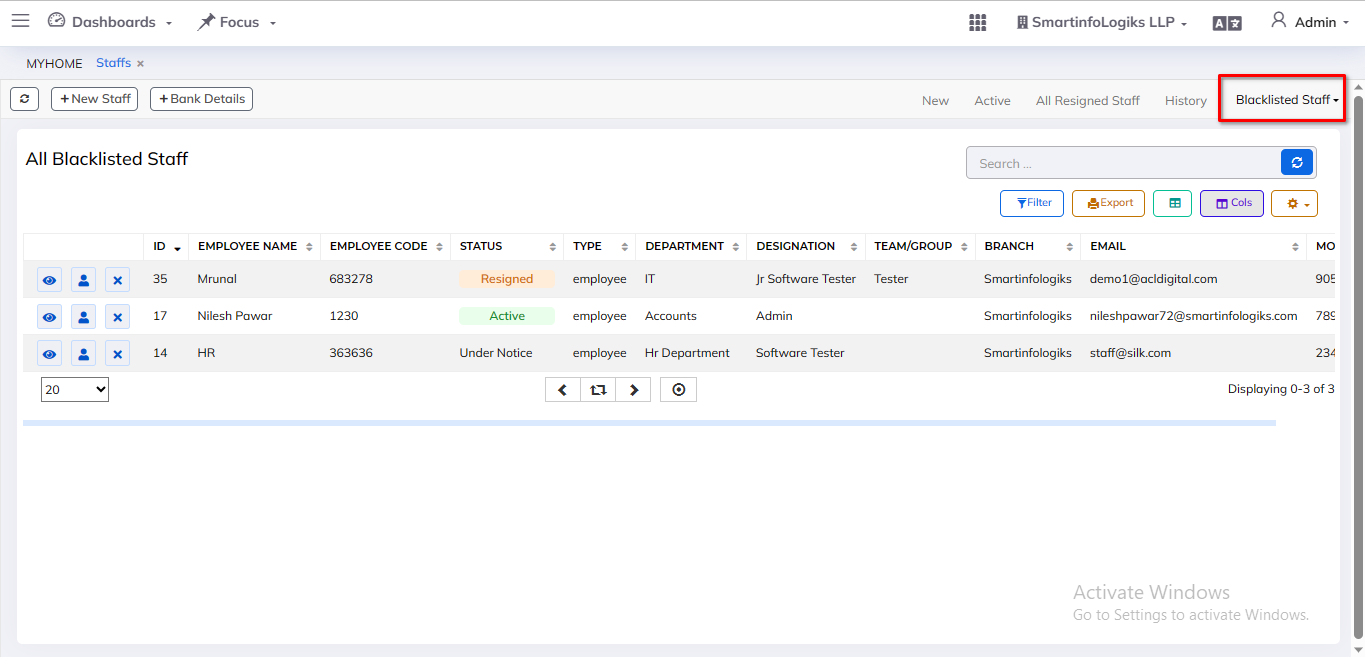
- The Blacklisted tab shows the reports of the employee who may have done any fraud with the company.
4.5.History Tab:-
- History tab gives the view Employee type status wise Records that are already existing.
- In History tab, Reports are displayed by employee category via the sidebar filter.
- In History tab, Employee type is displayed via a smartfilter together with employee status.
Steps:- - Go to the HR Module then Click on HR Staff
- Then go to the History Tab
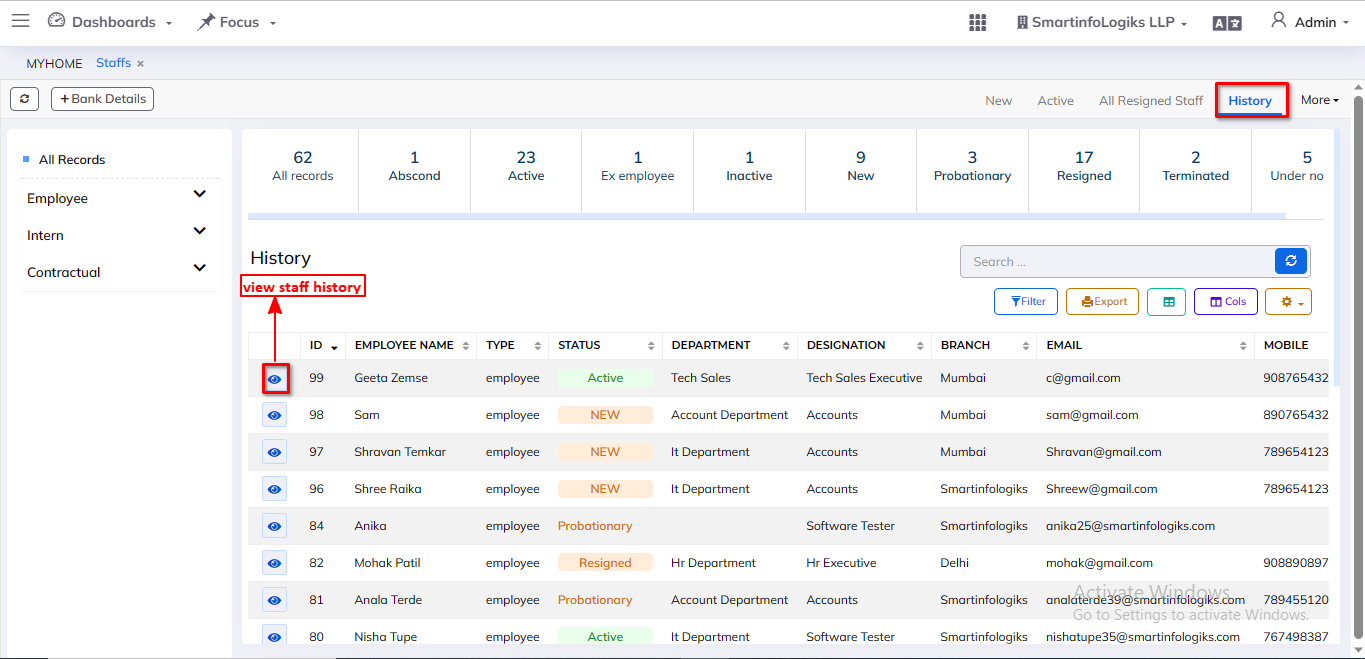
- On click of the View icon, users can view all status wise staffs.