A purchase is a routine operation carried by both individuals and corporations.
The purchase activity is normally a formal procedure when it comes to any orders and Service.
A Purchase Order is a binding contract with your Supplier that you promise to buy a set of items under given conditions.
Dashboard
Steps:
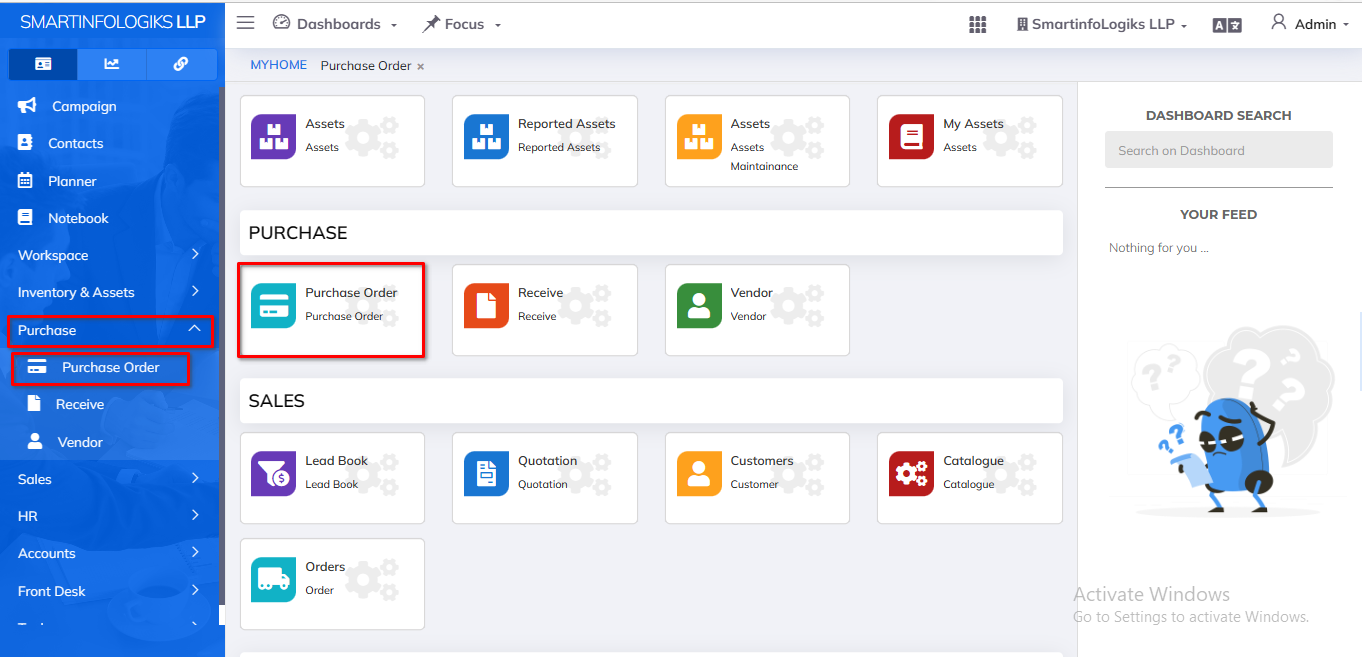
Click on the left side Menu List
Click on the Purchase
Click on the Purchase Order
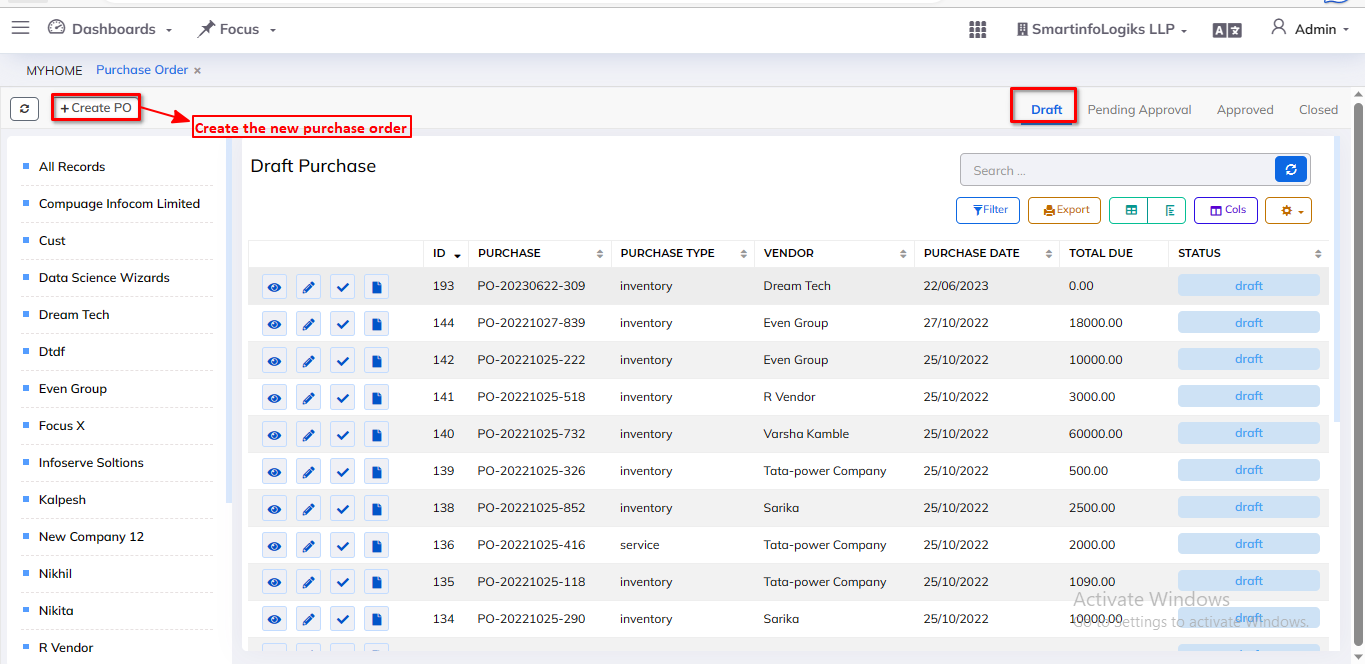
Purchase Order dashboard will be shown as below image:
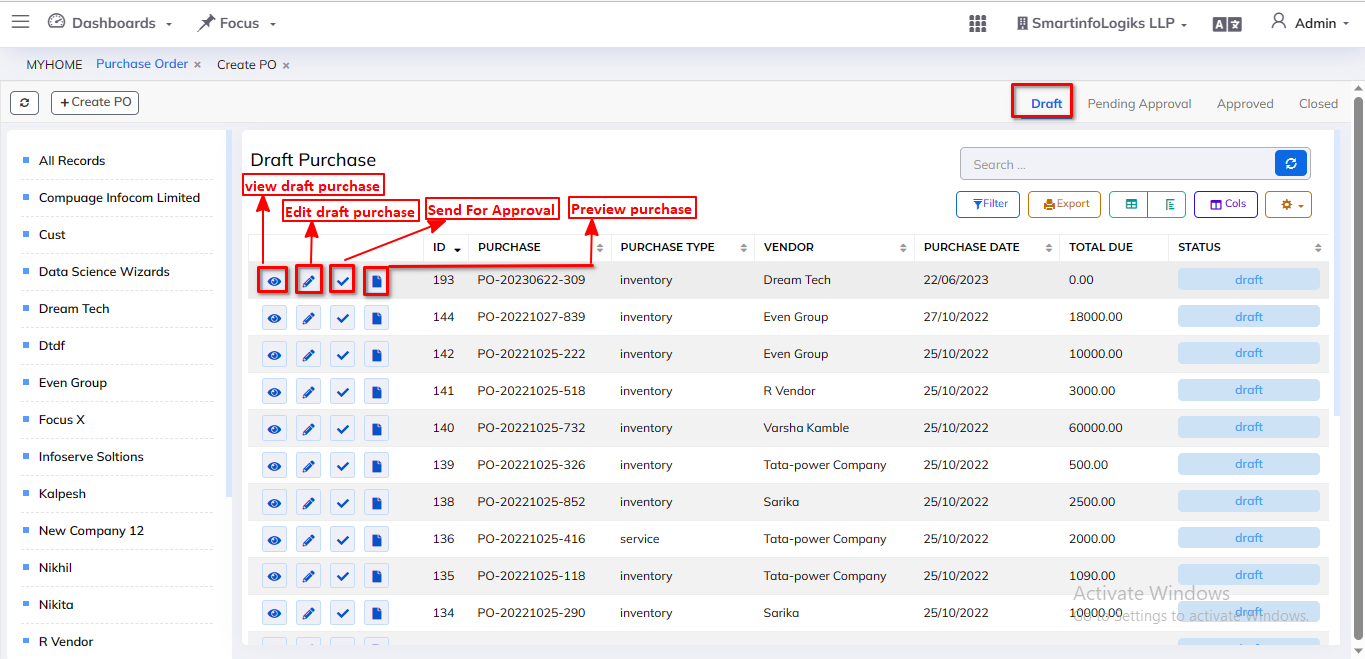
1.1.Draft Purchase Order:
If products, services, or other things are not already in stock, we establish a new purchase order, which is shown in the Draft purchase order tab. Steps:
Click on the Purchase Order
Click on the Create Draft Purchase Order
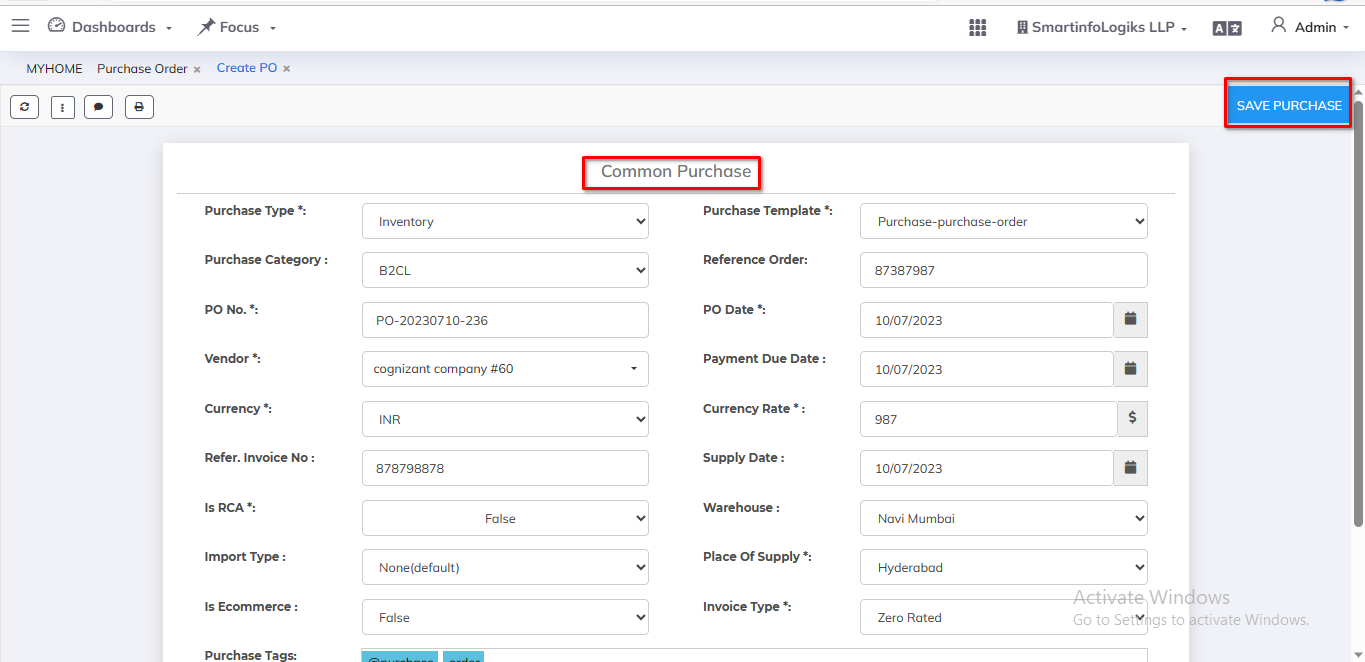
Create purchase order will get open as per the below image:
Click on the Create Purchase Order form to open as per the below image.
Enter all required details. 1.Purchase Type: Select Type using dropdown. 2.Purchase Template: Select Template using dropdown. 3.Purchase Category: Select Category using dropdown. 4.Purchase Date: Select Date. 5.Purchase No: Enter the Invoice no. 6.Reference Order: Enter the Reference order. 7.Vendor: Select Vendor using dropdown. 8.Payment Due Date: Select Due date. 9.Currency: Select Currency using dropdown. 10.Supply Date: Select Supply date. 11.Reference Invoice No: Enter the Invoice no. 12.Place of Supply: Select Supply using dropdown. 13.Is RCA: Select RCA using the dropdown. 14.Invoice Type: Select Type using dropdown. 15.Import Type: Select Type using dropdown. 16.Warehouse: Select Warehouse using the dropdown. 17.Is Ecommerce: Select Ecommerce using dropdown. 18.Purchase Tags: Enter the Tags. 19.Notes To Vendor (Delivery,PO,Others): Enter the Notes.
After filling all the mandatory fields click on the Save Purchase button.
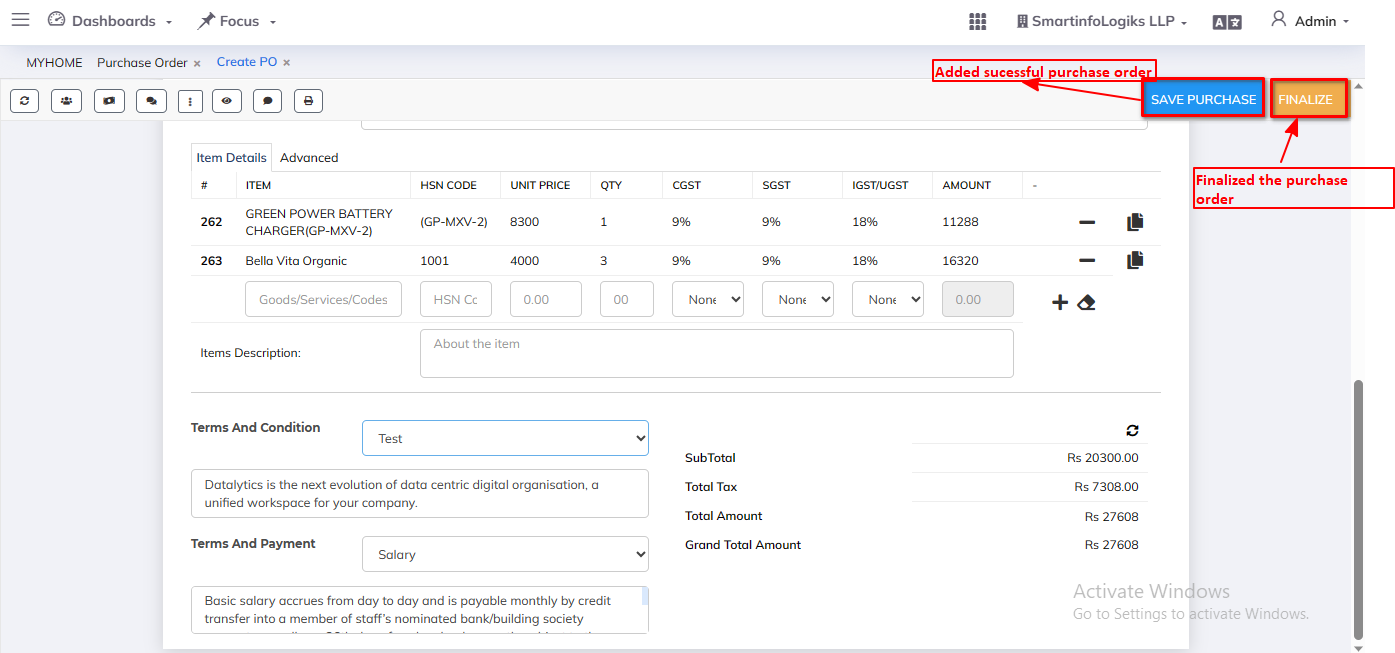
To Enter item details & advanced details, click on Save Purchase button as shown in below image:
Form will be open as shown in below image:
Enter all required details. 1.Item: Enter the Item. 2.HSN Code: Enter HSN Code. 3.Unit Price: Enter the Unit price. 4.Quality: Enter the Quality. 5.CGST: Select CGST using dropdown. 6.SGST: Select SGST using dropdown. 7.Amount: Enter the Amount. 8.Item Description: Enter item description 9.Terms and Condition: Select Terms and condition using dropdown. 10.Terms and Payment: Select Terms and payment using dropdown.
For Advanced item details, form will be shown as below:
After fill form, when click on Save Purchase then, report will be displayed in draft tab.
When click on Finalize then, report will be displayed in pending approval tab.
Added Item is displayed in Draft purchase Reports as shown in the below image.
On click of the Preview Draft purchase icon, users can preview purchase details.
On click of the View Draft purchase icon, users can view purchase details.
On click of the Edit Draft purchase icon, users can edit purchase details.
On click of the Finalize icon, users can finalize purchase details.
1.2.Pending Approval tab:
Steps:
Click on the Purchase Order
Click on the Pending Approval tab
After the Finalize purchase to display in the Pending Approval tab as per the below image.
On click of the Preview Pending Approval purchase icon, users can preview purchase details.
On click of the View Pending Approval purchase icon, users can view purchase details.
On click of the Edit Pending Approval purchase icon, users can Edit purchase details.
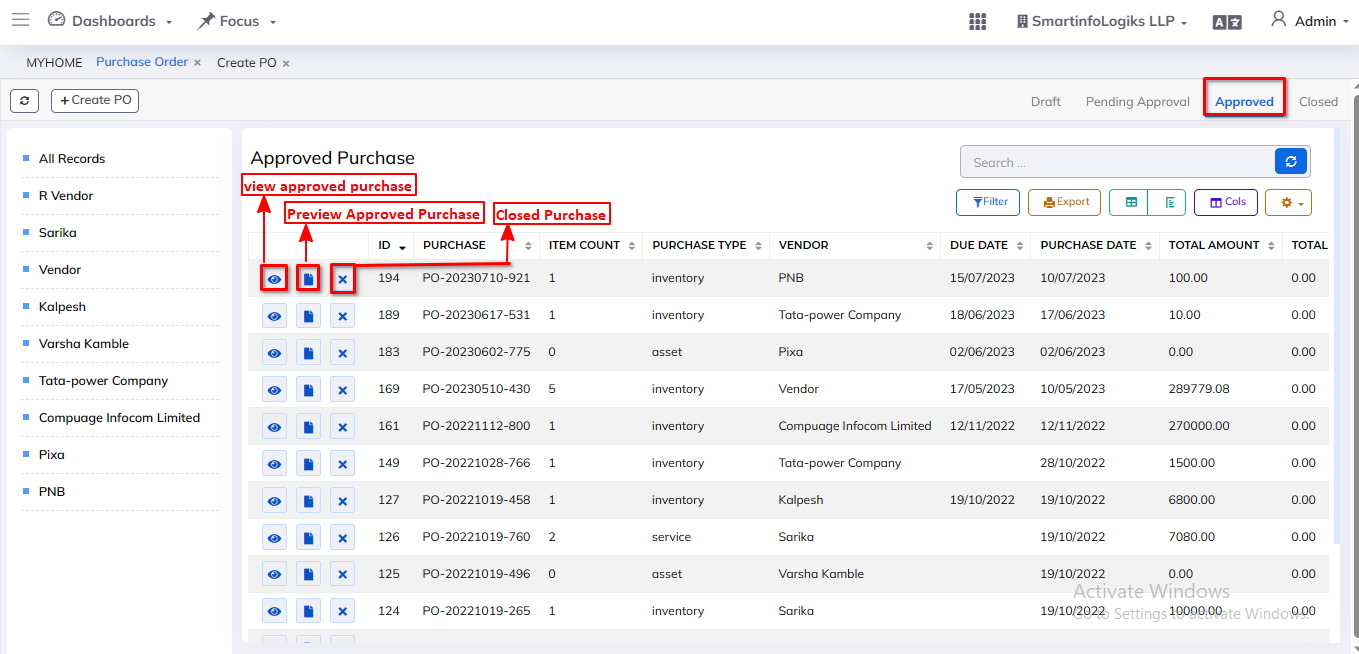
1.3. Approved tab:
Steps:
Click on the Purchase Order
Click on the Approved tab
After the Pending Approval purchase to display in the Approved tab as per the below image.
On click of the Preview Approved purchase icon, users can preview purchase details.
On click of the View Approved purchase icon, users can view purchase details.
On click of the Edit Approved purchase icon, users can Edit purchase details.
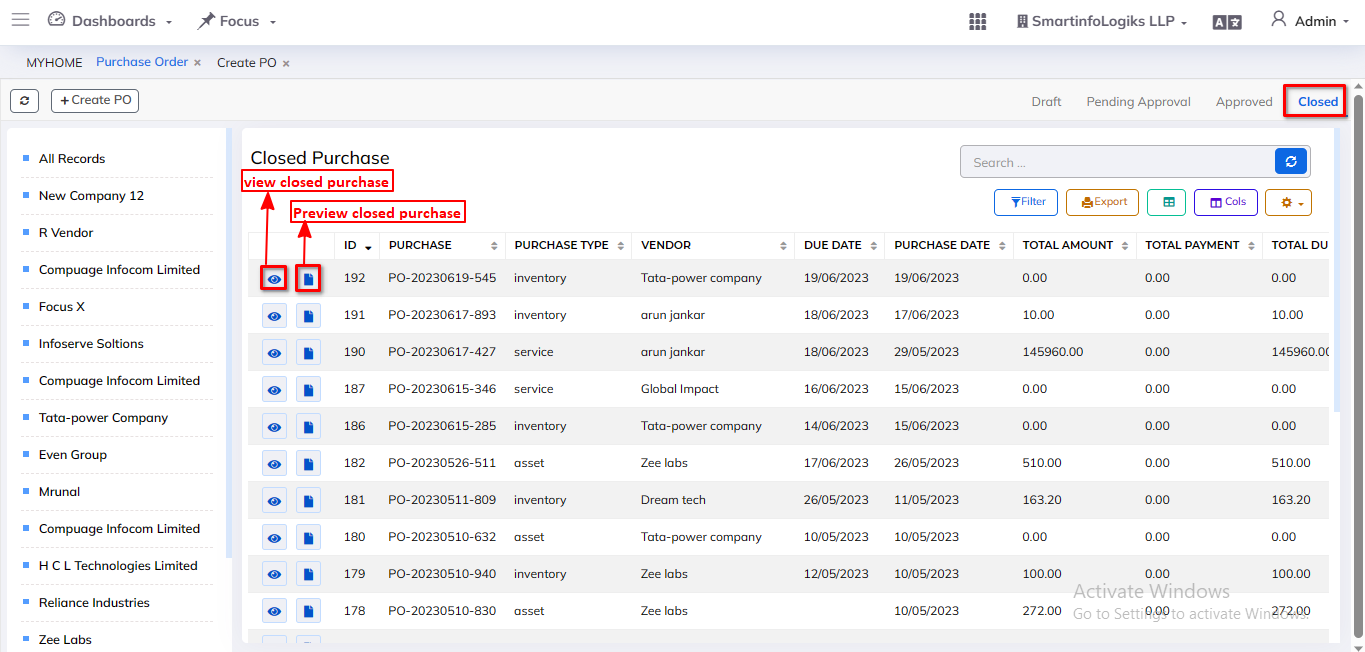
1.4. Closed tab:
Steps:
Click on the Purchase Order
Click on the Closed tab
After the Approved purchase to display in the Close tab as per the below image.
On click of the Preview closed purchase icon, users can preview purchase details.
On click of the View closed purchase icon, users can view purchase details.